Windows 10 – DISM Tool for Analyzing and Cleaning the WinSxS folder (Component Store)

Summary:  How to use the Microsoft DISM Tool to Analyze and Clean the Windows 10 WinSxS folder (Component Store)

Comments:

  • DISM(Deployment Image Servicing and Management [DISM.exe]) is a command-line tool that can be used to analyze and clean up the Windows 10 Component Store
  • The Windows 10 WinSxS folder typically hosts all the Component Store files
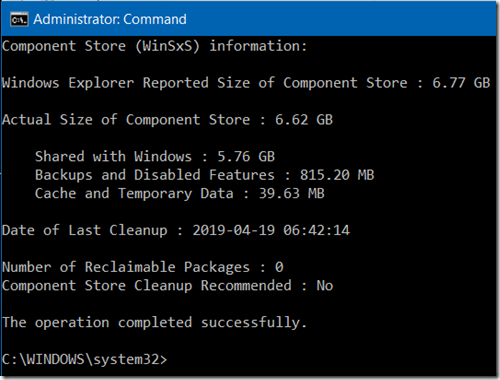
  • Using the DISM command-line tool for analyzing the Windows 10 Component Store will show the following details of the components present in the WinSxS folder:
    • Actual size of the components in the WinSxS folder and also broken down into three sub-sections
        • How much of the actual size is shared with Windows 10
        • How much of the actual size is dedicated to Backups and Disabled features
        • How much of the actual size is used for Cache and Temporary Data
    • The number of reclaimable packages
    • Component Store Cleanup Recommendation (Yes or No)
  • Using the DISM command-line tool for cleaning up Windows 10 Component Store may recover some space of the hard drive(or SSD) and reduce the size of the WinSxS folder recovering a few GB’s of storage capacity.  Editor Note:  Normally Windows 10 will clean the Component Store when necessary thus clean up may not always be required, but if your system indicates otherwise(**After analysis**) follow the cleanup instructions below.

How To:

  • Using DISM’s /AnalyzeComponentStore
    • Open an Elevated Command Prompt => Press Windows key + X ] then select the ‘Command Prompt (Admin)’ option
    • At  command line prompt enter
            • · DISM /Online /Cleanup-Image /AnalyzeComponentStore

image

          • The above is an example(snapshot/picture) that shows for a device tested(a recent clean install of Windows 10) that no Reclaimable Packages are present and also Component Store Cleanup is not recommended. (Note: The size of a component store can vary – normally about six(6) to ten(10) GB)
              • The analysis may take a few minutes. Do Not interrupt the process.
              • If your system indicates that Component Store Cleanup **IS** Recommended the DISM tool  /StartComponentCleanup command-line option can be used(instructions below)
  • Using DISM’s /StartComponentCleanup
    • Open an Elevated Command Prompt => Press Windows key + X ] then select the ‘Command Prompt (Admin)’ option
    • At  command line prompt enter
            • · DISM /Online /Cleanup-Image /StartComponentCleanup

image

          • The Component Store cleanup  may take a few minutes. Do Not interrupt the process. Once complete it will report "The operation completed successfully. Once complete, the Command dialog box window can be closed(Click ‘X’ in the upper right).  To finalize the cleanup process => Restart Windows 10


Revisions:

Jan  2  2019:  Initial Draft Date

Jan  6  2019: Initial Publish Date

Apr 20, 2019: Added graphics/pictures examples
Microsoft Surface update history

Summary:   Microsoft Surface web site for the latest and past released software and firmware updates


Comments:

  • Microsoft’s Surface Update History (Software and Firmware) web site for Surface devices
  • Applies to the following Surface devices
    • Surface, Surface Pro
    • Surface 2, Surface Pro 2
    • Surface 3, Surface Pro 3
    • Surface Pro 4
    • Surface Book, Surface Book with Performance Base
    • Surface Studio
  • Direct links to obtain update history for the above Surface devices
  • Surface Updates are automatically installed via Windows Update
  • Note: Surface Updates files can also be downloaded and installed manually for most Surface devices
    • The file name format is the Surface version, followed by the operating system, followed by the release number.
    • To obtain, download and install Surface Updates manually follow the steps in this procedure

W10_Surface3_SoftFirm_01

Additional Information:


Revisions:

November 22, 2016: Initial Draft and Initial Publish Date

December 8, 2016: Revised Comment section; Added ‘Applies to’ comment

January 14, 2017:  Added example picture to better explain the multiple files available for download and installation.

Windows 10 – DISM Tool for Checking and Repairing a Windows System Image

Summary: 

  • How to use the Microsoft DISM Tool to Check, Scan and Restore Windows 10 System Image Health

Comments:

  • DISM(Deployment Image Servicing and Management [DISM.exe]) is a command-line tool that can be used to determine the status[Health] of the Windows operating System Image’s Component Store.  The tool can also be used to Repair a Windows System Image
  • DISM’s command-line tool is run in an elevated command prompt
  • DISM is also available via PowerShell.  (Note: This article will not cover using DISM’ with PowerShell)
  • This article covers three(3) of the command line switches available for use with the DISM command
    • /CheckHealth  – Scans and reports if the System Image is healthy, corrupted, repairable, or non-repairable
        • Informative Only, Doesn’t Fix, Repair or Change
    • /ScanHealth – Scans and reports if corruption exists
        • Informative, Doesn’t Fix, Repair or Change (This scan will take several minutes and will provide a progress bar showing % progress – Do not interrupt)
    • /RestoreHealth – scan the Windows Image for component store corruption and automatically perform repairs
  • Use the DISM tool to determine the health of the Windows System Image if the built-in Windows System File Checker can not repair Windows file corruption.
  • If the DISM tool’s CheckHealth and ScanHealth options report the image (a) corruption **and** (b) is repairable, then use the DISM tools /Restore Health option.

How To: 

  • Using DISM’s /CheckHealth or /ScanHealth  option
  1. Open an Elevated Command Prompt => Press Windows key + X ] then select the ‘Command Prompt (Admin) option
  2. At the command line prompt enter one of the following
              • DISM /Online /Cleanup-Image /CheckHealth
              • DISM /Online /Cleanup-Image /ScanHealth
        • Note: A healthy system, i.e. no component store corruption will report findings as shown in the two pictures shown below

W10_DISM-CH_01 

 W10_DISM-SH_01

  • Using DISM’s Restore Health option (Note: Always perform a /CheckHealth and /ScanHealth prior to attempting a repair of the Windows System Image and ensure that the /CheckHealth option reports the image as repairable)
              • DISM /Online /Cleanup-Image /RestoreHealth


Additional Information:


Revisions:

January 6, 2016: Initial Draft and Publish Date

May 8th, 2016:  Updated and revised Comments section description of the command line switches

August 15, 2016:  Replaced example pictures for better view-ability

September 9, 2016: Added reference to using DISM for Windows Update errors caused by component corruption