Windows 10 – Revised End of Service Date for Windows 10 Version 1809

Summary:

Microsoft extends End of Service date for Windows 10 Version 1809

Comments:

  • Microsoft announced on April 14, 2020 that the ‘End-of-Service’ date for Windows 10 1809 has been extended to November 10, 2020 instead of expiring on May 12, 2020
  • The extension adds another six(6) months of support for receiving security updates
  • The extension applies to the following editions of Windows 10 1809
          • Home, Pro, Pro Education, and Pro for Workstations
  • Security updates will continue to be available through the same channels
        • Windows Update, Microsoft Catalog and Windows Server Update services
  • This End-of-Service revision also places a temporary pausing of Microsoft initiated feature upgrades from Windows 10 Version 1809 to a later Windows 10 Version(e.g. 1903, 1909)

Additional Information:

Revisions:

Apr 15 2020:  Initial Draft and Original  Publish Date

Apr 18 2020:  Added 2nd and 3rd items in the Additional Information section.

Windows 10 – Shutdown Problem Caused by Adobe Creative Cloud Update

Summary:

Windows 10 devices are not able to shutdown Windows 10 while logged on to Windows 10

Comments:

  • End-users are not able to shutdown Windows 10 devices when logged onto Windows 10
    • The Windows 10 device shutdown problem appears to be associated to a recent February 2020 Adobe CC(Creative Cloud) Update.
        • The presence of the Adobe CC update when attempting to shutdown Windows 10 when logged on to Windows 10 yields an error:
          • "Restart – You don’t have permission to shut down and restart this computer"
  • End-Users must first logoff Windows 10 and use the shutdown option provided on the Windows 10 logon screen
    • Optionally end-users who have the Adobe update installed and the inability to shutdown Windows 10 may have to Stop and Disable related Adobe services(Adobe Genuine Monitor, Adobe Genuine Software Integrity, and Adobe Update services) on their Windows 10 devices in Windows 10’s Services
  • Editor Note(Mar 15) 2020): Compliments to a BLEEPINGCOMPUTER article for aiding me to track down this issue and  provide a workaround for a Windows 10 Pro SB(small business specializing in Graphic Design using Adobe CC) end-user experiencing this problem.
  • Editor Note(Mar 15 2020): Adobe has pulled /rolled-back the update causing the problem and will resolve it with a future update

How To:

  • If experience this problem – two workarounds are suggested:
      • Logoff Windows 10 and use the ‘Shutdown Option’ on the Windows 10 logon screen
      • Stop and disable three(3) Adobe services(Genuine Monitor, Adobe Genuine Software Integrity, and Adobe Update) in Windows 10 services
            • Windows key +R > type services.msc > OK > scroll to and ‘Stop’ and ‘Disable each of the above noted Adobe services.

Additional Information:

Revisions:

Feb 27 2020: Initial Draft Date

Mar 3 2020: Original Publish Date

Mar 4 2020: Added ‘Editor Notes’ in the Comments; added Additional Information section

Windows 10 – Known Issues for Windows 10 Versions

Summary:

How and where to find Known Issues and their current status for Windows 10 versions

Comments:

  • Known Issues and their current status for each Windows 10 version is available from Microsoft
  • Known Issues and their current status for each Windows 10 version is included as additional information for Windows 10 Release Information
  • Each released Windows 10 version has its own dedicated itemized list of:
      • Known Issues
      • Resolved Issues
  • Each released Windows 10 version Known Issues list is broken down by:
        • Known Issues by Originating update, Status, and latest status date in table form
              • Originating Update is the Windows update involved that is causing or related to or reported to and/or validated as the cause and appearance the issue(i.e. wide scope of  actual or possible reasons)
        • Details of the known issue – supplemental information on each issue
        • Issue status by month – chronological history
  • Each released Windows 10 version Resolved Issues list is broken down by:
      • Resolved Issue by Originating update, Status, Date resolved
      • Details of the resolved issue – supplemental information on each issue
      • Issue status by month – chronological history
  • All the above information is available on Microsoft’s web site


How To:

  1. Open a browser and navigate to the Microsoft web site -  Windows 10 Release Information
  2. Look on the left hand side to see a list of all released Windows 10 versions
  3. Click on any Windows 10 version(e.g. 1909, 1903, etc.) to expand the version specific additional categories(‘Known issues and notifications’ or ‘Resolved issues'(see below graphic)
  4. Click on the ‘Known Issues and notifications’ or ‘Resolved Issues’ categories for additional information viewable on the web page

W10_RelInfo_01

   5.  Available information and content, as expected, is dynamic and updated when necessary


Revisions:

Feb  1 2020: Initial and Final Draft Date

Feb  2 2020: Original Publish Date

Feb 14 2020:  Added Resolved Issues section in Comments, corrected typo(Thanks Erin – HVD!)

Network Computers No Longer Present in File Explorer on Windows 10 Version 1909

Summary:

How to enable/re-enable network computer appearance and access in File Explorer on Windows 10 Version 1909

Comments:

  1. This blog article provides the an overview of how to ensure connectivity, functionality, visibility and view-ability across across all networked devices/computers in Windows 10 Version 1909’s File Explorer’s Navigation pane ‘Network’ folder by configuring specific Windows 10 ‘Services when using standard and acceptable network sharing methods in Windows 10. (Editor Note: This article is also applicable to earlier versions of Windows 10 e.g. 1903, 1809, 1803, etc.)
  2. Changes made by Microsoft Updates(Feature or Monthly Cumulative or Optional or Out-of-Band) may prevent an end-users ability to view and access shared devices(computers) in File Explorer’s Navigation Pane ‘Network’ folder option.
  3. This article assumes that Windows 10 is already configured for standard network sharing. If not, see the section immediately below titled ‘Basic Guidelines for Standard Network Sharing’. If already configured for standard network sharing skip to the ‘How To’ section for configuring Windows 10 Services.


Guidelines for Standard Network Sharing:

  • All devices should have the exact same/common Windows logon user profiles. As an example if John has two devices(of any type – desktop and tablet or two desktops…) then John should configure each device with exact same Windows logon profile using the exact same username and password(The Windows logon profile can be a Microsoft Account or a Local Account).
        • The same commonality would also apply in more than one user per device across those same two or more devices (e.g. John and Mary Windows logon profiles with same username/password on each device)
  • Change the Workgroup name on each device from the Windows default name ‘Workgroup’ to a name of your choice(Editor note: This is optional, but since everyone on the planet for at least the last three decades knows the default Windows workgroup name, imo it’s always a good idea to personalize it with your own workgroup name.  Also consider, for ease of use, change/personalize the device’s Computer Name to something that makes sense to you(Many pre-built OEM devices prename the device using an unrecognizable/cryptic name or the purchase order number or model number or an odd unrecognizable alphanumeric name)
  • Configure Network Discovery Sharing profiles identically in each and every Windows logon profile on each and every device.
      • Network Discovery has three separate network sharing profiles(Private, Guest or Public and All network)
        • Private => Network Discovery(On), Automatic Setup(On), File and Printer Sharing(On)
        • Guest or Public => Network Discovery(Off), File and Printer Sharing(Off) – If needed for some specific reason, it can be turned on but for most home networking ‘Off’ is recommended.
        • All Network => Public folder sharing(On), 128 bit encryption(On), Password Protected Sharing(On)
            • Note: In a home networking situation, if the current network sharing profile is shown as ‘Public’ then file and printer sharing is not possible. Changing the network sharing profile to ‘Private’ can be accomplished via Windows 10 Settings for your type of connection(Ethernet or WIFI; if using both, change both to Private)
                    • ==>  Settings/Network & Internet/Status/Change connection Properties
  • Create and share a designated folder on each device in each windows profile in addition to the Windows 10 provided ‘Public folders’ for sharing and accessing. Creating and sharing your own designated folder on each device provides a common, unique and additional location for saving and copying files across networked devices.  Other user profiles specific folders that might be considered for sharing(e.g. Documents, Downloads, Pictures). 
  • Configure your router to assign the same(Static) IP address to each device on the network
  • Create and configure a Windows Credential with each device’s ‘computername’ in each Windows logon profile with the same identical Windows logon profile(username and password)
  • Editor Note: Some application software and hardware(e.g. Printers, Scanners, Routers, etc.) may still be using an older and deprecated file sharing protocol called SMBv1. SMBv1 was deprecated for security reasons related to Ransomware malware which spread using vulnerability in the SMBv1 protocol.  Windows 10 provides support for SMBv2 and SMBv3 – the current, secure and safer protocols, but in some cases SMBv1 is still necessary(even though not recommended) for some software/hardware.  Unless absolutely necessary SMBv1 should be disabled in Windows features.
          • Microsoft maintains web page on software and hardware still using SMBv1 and can be found using the following url  => SMB1 Product Clearinghouse


How To:

  • Configuring Windows Services

The steps to re-enable the ability to view and access shared devices/computers are shown below and requires changing Windows 10 Services settings items called ‘Function Discovery Resource Publication’ ‘Function Discovery Provider Host’, SSDP and UnPnP to Automatic and Starting the service (Note The last two SSDP and UnPnP_are optional but on many devices enabling these two additional Services can be a benefit)

    • Access the Windows 10 Run dialog box via the Start Menu/Windows System/Run option or by pressing the Win + R keys on the keyboard.   Note: One can skip Step 1 and 2 and proceed to Step 3 if accessing the Services settings via search(Click/Tap the Windows Start Menu icon and enter ‘Services’  then click or tap on Services(Desktop app)
    • If using the Run dialog box – enter services.msc in the Run dialog box then press Return to load the Services dialog box window
    • Scroll down in the Services window and select and double click/tap on ‘Function Discovery Resource Publication’ item(aka ‘FDResPub’ the service name assigned by Windows) to access the service’s properties
    • Change the ‘Startup type’ field entry from ‘Manual’ to ‘Automatic’ or ‘Automatic Delayed Start’
    • In the same properties dialog box ‘Service status’ section click on Start (to start the FDResPub service) – see pic below (If the service is already started skip this step).  A picture/graphic is shown below  of  the service being enabled and started.
    • Once the ‘Service status’ indicator shows ‘Running’ Click ‘OK’ to close the Properties dialog box
    • Repeat Step 3 through 6 for the other services – ‘Function Discovery Provider Host’, SSDP and ‘UnPnP’    (See Footnote [A])
    • Close the Services window.  Close all open windows and Restart the device.  FDResPub_01


Footnote:  [A]

  • Other articles on the internet suggest  Removing shared locations(e.g. C:\Users) and re-adding shared locations;  or other more under-the hood measures such as editing the Windows ‘hosts’ file and adding each respective IP addresses for each shared device on the network in the ‘hosts’ file.
      • Editor Notes:
        • Removing shared locations(folder) and re-adding may help in certain cases
        • Sharing the entire C:\Users folder is not recommended since many subfolders in C:/Users are by design intent classified by Windows as ‘Hidden files and folders’ an solely unique to the Windows 10 logged on user
        • Likewise, adding assigned router ip addresses for each device in the Windows ‘hosts’ file may be another wasted effort. 
          • In general =>  It’s a good idea to avoid tampering with settings and/or files that are not necessary.


Revisions:

Jan 10, 2020: Initial Draft

Jan 15 2020: Original Publish Date


Windows 10 – Guidelines for Configuring Devices for Networking and Sharing

Summary:

A step by step guide to configuring Windows 10 devices for networking and sharing

Comments:

  • This article is intended for end-users(consumers) of Windows 10 devices desiring to network devices and share folder(s)/files across networked devices
  • This article is applicable to Windows 10 Pro and Home Editions
        • The same method/guidelines can be applied to Windows 8.1 and Windows 7 editions and devices
  • Networking related topics and configuration covered in this article are:
    • Windows logon
    • Workgroup name
    • Computer name
    • Network Discovery (for file and printer sharing)
    • Shared Folders
    • Use of unique router assigned IP address
    • Windows Credentials
    • Security (SMBv1 File Sharing protocol vulnerability)

How To:

Guidelines for Standard Network Sharing:

  • All devices should have the exact same/common Windows logon user profiles. As an example if Britney has two devices(of any type – desktop and laptop or two desktops or two laptops etc.) then Britney should configure each device with the(her) exact same Windows logon profile using the exact same username and password(The Windows logon profile can be a Microsoft Account or a Local Account).
        • The same commonality would also apply in more than one user per device across those same two or more devices (e.g. Britney and Prince Windows logon profiles with same username/password on each device)
  • Change the Workgroup name on each device from the Windows default name ‘Workgroup’ to a name of your choice(Editor note: This is optional, but since everyone on the planet for at least the last three decades knows the default Windows workgroup name, imo it’s always a good idea to personalize it with your own workgroup name).  Also consider, for ease of use, change/personalize the device’s Computer Name to something that makes sense to you(Many pre-built OEM devices prename the device using an unrecognizable/cryptic name or the purchase order number or model number or an odd unrecognizable alphanumeric name)
  • Configure Network Discovery Sharing profiles identically in each and every Windows logon profile on each and every device.
      • Network Discovery has three separate network sharing profiles(Private, Guest or Public and All network)
        • Private => Network Discovery(On), Automatic Setup(On), File and Printer Sharing(On)
        • Guest or Public => Network Discovery(Off), File and Printer Sharing(Off) – If needed for some specific reason, it can be turned on but for most home networking ‘Off’ is recommended.
        • All Network => Public folder sharing(On), 128 bit encryption(On), Password Protected Sharing(On)
            • Note: In a home networking situation, if the current network sharing profile is shown as ‘Public’ then file and printer sharing is not possible. Changing the network sharing profile to ‘Private’ can be accomplished via Windows 10 Settings for your type of connection(Ethernet or WIFI; if using both, change both to Private)
                    • ==>  Settings/Network & Internet/Status/Change connection Properties
  • Create and share a designated folder on each device in each windows profile in addition to the Windows 10 provided ‘Public folders’ for sharing and accessing. Creating and sharing your own designated folder on each device provides a common, unique and additional location for saving and copying files across networked devices.  Other user profile specific folders that might be considered for sharing(e.g. Documents, Downloads, Pictures). 
  • Configure your router to assign the same(Static) IP address to each device on the network
  • Create and configure a Windows Credential with each device’s ‘computername’ in each Windows logon profile with the same common, identical Windows logon profile(username and password)

Editor Note: Some application software and hardware(e.g. Printers, Scanners, Routers, etc.) may still be using an older and deprecated file sharing protocol called SMBv1. SMBv1 was deprecated for security reasons related to Ransomware malware which spread using vulnerability in the SMBv1 protocol.  Windows 10 provides support for SMBv2 and SMBv3 – the current, secure and safer protocols, but in some cases SMBv1 is still necessary(even though not recommended) for some software/hardware.  Unless absolutely necessary SMBv1 should be disabled in Windows features.

          • Microsoft maintains web page on application software and hardware that is still using SMBv1 and can be found using the following url:

Revisions:

Dec 15 2019: Initial Draft Date

Dec 24 2019: Original Publish Date (Merry Christmas)

Feb 22 2020: Added Comments section; Corrected/changed formatting

Windows 10 – Avast AVG Compatibility Issues

Summary:

Compatibility Issues with some earlier versions of Avast and AVG anti-virus editions affecting Windows 10

 Comments:

  • Microsoft and Avast have identified problems with using earlier/outdated versions of Avast and AVG anti-virus software on Windows 10 Versions 1909 and 1903
  • These compatibility issues prevent upgrading Windows 10 from an earlier version to later Windows 10 versions – 1903(May 2019 Update) and 1909(November 2019 Update)
      • Note: The inability to upgrade impacts upgrading via Windows Update, the Media Creation Tool created media, and the online Upgrade Now methods
  • The compatibility issues surfaced in late November 2019
  • Avast and AVG versions 19.5 and lower are no longer compatible with Windows 10
  • Devices with installed versions of Avast or AVG 19.5 or lower will not be offered or capable to upgrade to Windows 10 1909 or Windows 10 1903
  • End users of Avast and AVG products should/need to download and install an updated version of their Avast or AVG application – Editor Note: Preferably the latest available version
  • End users of Avast or AVG anti-virus software that install the latest version will no longer have the compatibility issue preventing upgrading Windows 10 from an earlier version to Windows 10 versions 1909 or 1903

Additional Information:


Revisions:

Nov 23 2019: Initial Draft Date

Nov 26 2019: Final Draft Date

Dec 1 2019: Original Publish Date

Dec 7 2019:  Added ‘Note’ and ‘Editor Note’ in the  ‘Comments’ section

Windows 10 Version 1909 November 2019 Update

Summary:

Microsoft releases Windows 10 Version 1909 November 2019 Update

Comments:

  1. Microsoft released the latest major feature update(named November 2019 Update) for Windows 10 Version 1909 Build 18363.418 today(Nov. 12, 2019)
  2. Windows 10 Version 1909 is now available to mainstream consumers and business users that wish to manually install the feature update via Windows Update ‘Check for Updates’  (Note: Not all devices may be deemed ready to install Windows 10 1909 – the most common reason would be due to a compatibility issue where a ‘safeguard hold is in place’ by Microsoft to ensure a good update experience for the respective device)
  3. Windows 10 Version 1909 is also available via The Windows 10 download site, and via the Windows 10 Media Creation Tool.  (Note: Not all devices may be deemed ready – see Note in Comment #2 above). Editor Note:  The Windows 10 Download site’s ”Update Assistant – Update Now’ option for 1909 will be available the week of November 18th)
  4. Windows 10 Version 1909 will be deployed/rolled out automatically via Windows Update(not all capable devices will receive the feature update at the same time since the deployment – rollout is staged)
  5. Windows 10 Version 1909 will update a Windows 10 device from the installed prior version of Windows 10(e.g. Windows 10 Version 1903, 1809, etc.)


Additional Information:


Revisions:

Nov 12 2019: Initial Draft

Nov 13 2019: Original Publish Date

Nov 14 2019: Added Editor Note in Comment #3 (Thank you for the ping, Rangiku[from Tokyo!])

Windows 10 – Edge Chromium Tracking Protection

Summary:

Overview of Edge Chromium Tracking Protection Settings and Features

Comments:

  • Edge Chromium provides a more simple user interface to configure privacy concerns on 3rd party tracking
  • Edge Chromium is currently in Beta but available for consumer via the Edge Chromium Beta Channel program
  • Edge Chromium is Microsoft’s replacement browser for Windows 10’s included Edge(HTML)
  • Edge Chromium will be available as a non-beta version in the future(expected in January 2020)


Tracking Prevention:

  • A more simplified user interface for configuring end-user tracking prevention
    • Edge Chromium provides three different configuration options related to tracking privacy
      • Basic
      • Balanced
      • Strict

EdgeCr_Tracking_01

  • Blocked Trackers
    • Allows one to view the sites that Edge Chromium has blocked based on your configuration setting(Basic, Balanced, Strict)
  • Exceptions
    • An option allowing the user to add specific sites that override the tracking prevention setting
  • Strict Tracking for InPrivate Browsing
    • An option to always use ‘Strict’ tracing prevention with Edge Chromium during InPrivate browsing usage. When toggled on, it will override(if chosen) the Basic and Balanced option.
  • Example of the ‘Blocked trackers’ results after casual surfing(over a 10 minute period) on the web across a variety of sites.  Note: The picture only shows the first seven(7) items in the available list.

EdgeCr_Tracking_02

Revisions:

Oct 2 2019: Initial Draft Date

Oct 3 2019: Original Publish Date

Windows 10 – Updates may fail to install – Error 0x80073701

Summary:

  • Installation of Windows updates may fail with the message – "Updates Failed’ with ‘Error 0x80073701’


Comments:

  • This article applies to Windows 10 Version 1903
  • This article applies to Windows Update
  • The failure to update is suspected to be caused by KB4497935 May 29, 2019 Quality Update(an optional non-security update that included a number of ‘quality’ fixes)
    • Unknown at this time if the issue is related to Windows Update, Window 10 or Windows 10 Component Store/Image
  • This issue does not impact all Windows 10 devices having first appeared in isolated cases when attempting to install Windows updates automatically or manually in June through July 2019

Editor Note: This issue is now resolved by installing KB4524570 and applicable to Windows 10 1903(and 1909). If the issue still persists see Recommendation #3 below(or optionally see/reference KB4528159)

Recommendations:

1.  Use the Windows 10 Troubleshooter for Windows Update. The Windows 10 Troubleshooter is located  in ”Settings/Update and Security/Troubleshoot/Windows Update’

2.  Use the DISM’s tool command line interface to Check, Scan, and Restore Windows 10 System Image

3. Use the DISM’s tool command interface for Analyzing and Cleanup of the Windows 10 Component Store

Revisions:

Aug 15 2019: Initial Draft Date

Aug 18 2019: Original Publish Date

Nov 14 2019: Added Editor Note in Comments – Issue resolved by KB4524570

Windows 10 – How to find the current installed version

Summary:

  • How to find the Version and Build number of the current installed Windows 10 operating system

How To:

  • Three different methods to find Windows 10 current installed Version and Build number
    • Start button/Settings/System/About/Windows Specifications
    • Start Button/Settings/Update and Security/Windows Update, then scroll down and click on
      ‘OS Build info then look for the section ‘Windows Specifications’

The third(below) is my preferred route since it’s usually accomplished faster than navigating(click-tap-swipe using finger/mouse) via ‘Settings’  

    • Press and hold the ‘Windows key’ then press ‘R’ to open the Run Dialog box
        • In that dialog box enter =>      winver
          • A new window will open showing the version and build.


Revisions:

July 3 2019: Initial and Final Draft

July 4 2019: Original Publish Date

July 7 2019: Corrected typo/grammar [its=>it’s] (Thanks for the email/ping Wendy!)

Windows 10 – Release Information

Summary:

  • Release Information for Windows 10  by OS Version, Build, Latest Revision Date, and End of Service/Support Date


Comments:

Additional Information:

  • Windows 10 Version(Feature Updates) are/have been released twice(2X) per Year
  • The twice per year(Feature Updates) releases are called the Semi-Annual Channel
    • Each Semi-Annual Channel is identified with a new ‘Version’ number
      • Each ‘Version’ is updated/serviced monthly with a new ‘Build’ number
    • Each Semi-Annual Channel is normally serviced/supported for a period of 18 to 30 months depending upon life cycle policy. 
      • Consumers editions(Home and Pro) normally have the 18 month servicing
      • Business and Educational editions(Enterprise, Education) have the longer 30 month servicing


Revisions:

June 5 2019: Initial Draft

June 6 2019: Original Publish Date

June 9 2019:  Added time frame to better explain servicing/support for different editions

Windows 10 Version 1903 May Update

Summary:

Microsoft releases Windows 10 Version 1903 May 2019 Update on May 21 2019

Comments:

  1. Microsoft released the latest major feature update(named May 2019 Update) for Windows 10 Version 1903 Build 18362.116 today(May 21, 2019)
  2. Windows 10 Version 1903 is now available to mainstream consumers and business users that wish to manually install the feature update via Windows Update ‘Check for Updates’
  3. Windows 10 Version 1903 is also available via The Windows 10 download site, and via the Windows 10 Media Creation Tool.  (Note: Not all devices may be deemed ready to install Windows 10 1903)
  4. Windows 10 Version 1903 will be deployed/rolled out automatically via Windows Update(not all devices will receive the feature update at the same time)
  5. Windows 10 Version 1903 will update a Windows 10 device from the installed prior version of Windows 10(e.g. Windows 10 Version 1809, 1803, etc.)


Additional Information:


Revisions:

May 15 2019:  Initial Draft Outline

May 21 2019: Final Draft

May 21 2019: Initial Publish Date

Windows 10 Version 1809 – Intel Microcode Updates

Summary:   Intel Processor(CPU) microcode update for Windows 10 Version 1809 addressing Spectre and Terminal Fault security vulnerabilities


Comments:

    • This Intel Microcode update for Windows 10 Version 1809 address 3 security vulnerabilities
        • Two Spectre variants(3a and 4) and the L1 Terminal Fault(L1TF)
    • Windows 10 Version 1809 Intel microcode updates are stand-alone updates and currently only available in the Microsoft Catalog though in the future it may also be deployed through Windows Update
    • This Microcode updates include previous released microcode updates
    • Applicable to Windows 10 Version 1809 and noted in the Knowledge Base(KB) article section
    • Applicable to specific Intel CPU’s as noted in the Knowledge Base article
      • Note: Install the update for the applicable processor


Microsoft Knowledge Base(KB) article:


How to Obtain:

image

Additional information::

Revisions:

Apr  5 2019: Initial Draft Date

Apr  6 2019: Initial Publish Date

Apr  9 2019: Added pic(snapshot/graphic) of KB4465065 in Microsoft Catalog

Apr 10 2019: Added ‘Additional Information’ section

Windows 10 – DISM Tool for Analyzing and Cleaning the WinSxS folder (Component Store)

Summary:  How to use the Microsoft DISM Tool to Analyze and Clean the Windows 10 WinSxS folder (Component Store)

Comments:

  • DISM(Deployment Image Servicing and Management [DISM.exe]) is a command-line tool that can be used to analyze and clean up the Windows 10 Component Store
  • The Windows 10 WinSxS folder typically hosts all the Component Store files
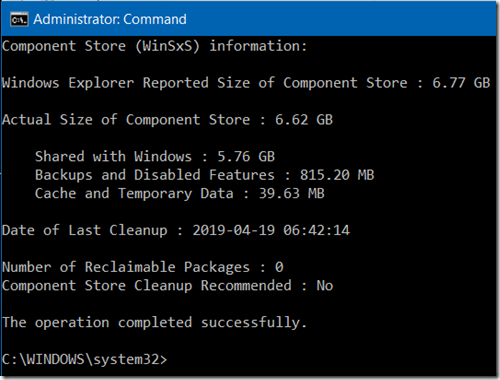
  • Using the DISM command-line tool for analyzing the Windows 10 Component Store will show the following details of the components present in the WinSxS folder:
    • Actual size of the components in the WinSxS folder and also broken down into three sub-sections
        • How much of the actual size is shared with Windows 10
        • How much of the actual size is dedicated to Backups and Disabled features
        • How much of the actual size is used for Cache and Temporary Data
    • The number of reclaimable packages
    • Component Store Cleanup Recommendation (Yes or No)
  • Using the DISM command-line tool for cleaning up Windows 10 Component Store may recover some space of the hard drive(or SSD) and reduce the size of the WinSxS folder recovering a few GB’s of storage capacity.  Editor Note:  Normally Windows 10 will clean the Component Store when necessary thus clean up may not always be required, but if your system indicates otherwise(**After analysis**) follow the cleanup instructions below.

How To:

  • Using DISM’s /AnalyzeComponentStore
    • Open an Elevated Command Prompt => Press Windows key + X ] then select the ‘Command Prompt (Admin)’ option
    • At  command line prompt enter
            • · DISM /Online /Cleanup-Image /AnalyzeComponentStore

image

          • The above is an example(snapshot/picture) that shows for a device tested(a recent clean install of Windows 10) that no Reclaimable Packages are present and also Component Store Cleanup is not recommended. (Note: The size of a component store can vary – normally about six(6) to ten(10) GB)
              • The analysis may take a few minutes. Do Not interrupt the process.
              • If your system indicates that Component Store Cleanup **IS** Recommended the DISM tool  /StartComponentCleanup command-line option can be used(instructions below)
  • Using DISM’s /StartComponentCleanup
    • Open an Elevated Command Prompt => Press Windows key + X ] then select the ‘Command Prompt (Admin)’ option
    • At  command line prompt enter
            • · DISM /Online /Cleanup-Image /StartComponentCleanup

image

          • The Component Store cleanup  may take a few minutes. Do Not interrupt the process. Once complete it will report "The operation completed successfully. Once complete, the Command dialog box window can be closed(Click ‘X’ in the upper right).  To finalize the cleanup process => Restart Windows 10


Revisions:

Jan  2  2019:  Initial Draft Date

Jan  6  2019: Initial Publish Date

Apr 20, 2019: Added graphics/pictures examples

Windows 10 Quick Start Guides

Summary:  Microsoft’s Quick Start Guides for Windows 10

Comments:

  • Microsoft provides a variety of ‘Quick Start’ guides to help learn Windows 10
  • Guides are in the form of standard PDF Documents
  • Guides are intended to be overviews yet provide sufficient detail to shorten the learning curve
  • Links(below) to Quick Start Guides will automatically open the respective guide’s PDF file in a new window in your default PDF viewer or browser

Windows 10 Quick Start Guides:

  • Desktop   (8 pages)
    • Start Menu options(Start Button, Accessing Documents and Pictures folder, Settings, Power Options, Grouping programs and apps on the Start Menu);
    • Task Bar features(Start Button, Search, Task View, File Explorer, Microsoft Store, Edge Browser OneDrive, Audio/Volume settings, Network Connection(LAN/Wi-Fi));
    • Action Center(Notification and Actions to settings and common configurable settings)
    • Windows Settings(System, Devices, Personalization, Apps, Accounts, Network and Internet, Privacy, Updates and Security, Ease of Access, Cortana, Gaming, Phone)
    • Cortana(Microsoft’s digital assistant)
    • Task View(feature providing the ability to group app by type or desire in multiple accessible virtual desktop views)
  • Windows Defender  (7 pages)
    • Taskbar Icon, Protection Status, Security Center, Settings
  • Connect to a network printer (8 pages)
    • Adding a network printer
        • Note: Windows 10 will recognize and setup almost all printers when connected to the device or identified when present on a local network connected via LAN or Wi-fi, if not,  the guide can provide useful tips.
  • Photos App   (9 pages)
    • Menu, Features, Organization, Editing Photos and Videos
  • Movies & TV App   (4 pages)
    • Menu, Types of Content – Movies, TV, Videos; Default Settings configurable options
        • Note: Movies and TV are Microsoft Store and Microsoft Account based; Videos are what you made yourself
  • Maps App  (6 pages)
    • Location, Directions, Destination, Traffic, Road view, Aerial view, Street side, Zoom
  • Microsoft Store  (5 pages)
    • Accessing the Store, Available Content(Apps, Games, Books, Movies/TV, Themes, etc.), Content from any device

Revisions:

Dec  3 2018: Initial Draft Date

Dec  8 2018: Initial Publish Date

Dec 10 2018:  Added Editor Note and additional Notes for clarification

Windows 10 Version 1809 – October 2018 Update

Summary:

Microsoft released Windows 10 Version 1809 October 2018 Update on October 2, 2018

Comments:

  1. Microsoft released the latest major feature update(named October 2018 Update) for Windows 10 Version 1809 Build 17763.1 today(October 2, 2018)
  2. Windows 10 1809 update is available at this time via Windows Update, The Windows 10 download site, and via the Windows 10 Media Creation Tool.  (Note: Not all devices may be deemed ready to install Windows 10 1809)
  3. Windows 10 1809 Update will be deployed/rolled out automatically via Windows Update(not all devices will receive the feature update at the same time)
  4. Windows 10 1809 Update will update a Windows 10 device from the installed prior version of Windows 10(e.g. Windows 10 Version 1803, 1709,  etc.)
  5. Windows 10 1809 includes new privacy controls that enhance the privacy choice and controls available to users for managing their own privacy.  Additionally each new account on a device can personally tailor the main privacy settings, instead of only the initial user who sets up the device. 

How To:

  • To obtain Windows 10 Version 1809 Build 17763.1
    • Access Windows Update on Windows 10 and manually check for updates
    • Visit the Microsoft Windows 10 Software Download site and choose the ‘Update Now’ option
    • Download the Windows 10 Media Creation Tool(MCT) executable(*.exe) file from the Microsoft Windows 10 Software Download web site then run the MCT exe file to create USB or DVD media or optionally create and save an ISO file which can be used for mounting or creating media

Additional Information:


Revisions:

Oct 2 2018: Initial Draft and Publish Date

Oct 3 2018: Corrected typo – Comments section Item #5

Installing Windows Live Mail 2012 On Windows 10

Summary:  How to Install Windows Live Mail 2012 on Windows 10

Comments:

  • Installation on Windows 10 requires the Windows Essentials 2012 Full Version Installer
    • The web based installer version can not be used since the install will attempt to download files from a no longer existent server and the installation will fail in a few seconds.
    • If not having previously archived the Windows Essentials 2012 full version installer your only options are to obtain the full version installer from an alternate source(friend, neighbor, colleague, 3rd party site on the internet that may be hosting the full version installer)
    • The full version installer:   (English version)
            • Filename is wlsetup-all.exe
            • File version is 16.4.3528.331
            • File Size is 134, 112 KB(130MB)
            • Digital signature date‎  is Monday, ‎April ‎7, ‎2014 12:09:33 PM
  • Requires .NET 2.0
  • If installing the English version in a country different than the United States see the precautionary ‘Special Instructions:’ Note(in red) below.

Procedure:

  1. Obtain the full version installer
  2. Install .NET 2.0 by enabling .NET 3.5 in Windows 10 Program and Features/’Turn Widows features on or off ‘ then Check the box adjacent to .NET Framework 3.5(includes .NET 2.0 and 3.0).  Click OK.  Close Programs and Features. This step is mandatory — .NET 2.0 must be installed prior to running the installer program executable.
  3. Run the full version installer in Administrator mode(Rt. Click and choose ‘Run as Administrator’
  4. When prompted – Select the option titled – ‘Choose the programs you want to install’
  5. Select ‘Mail’
  6. Click ‘Install.   Do not interrupt the installation. 
  7. Once the installation is complete, the program will/may run and prompt to setup an email account. Set up your email account or cancel and setup later.  When setting up an email account it would be prudent to do it manually by choosing the ‘Manually configure server settings’ option.   Important -  if setting up an Outlook.com type email account(Outlook/Live/Hotmail/MSn.com) ensure setup is done manually and only choose the IMAP or POP protocol. Do not choose/use the ‘Windows Live Hotmail’ option since that choice will attempt to use the Http(DeltaSync) protocol which is no longer supported by the backend Office 365 Platform server.


Special Instructions:

  • Note:  Using the English language full installer version in a country different than the United States
        • If installing the English language version in a location(different country) than the U.S. additional steps  must be taken for a successful installation
        • Disconnect from the Internet
        • Navigate in Windows 10 to Settings/Time and Language/Region and change to U.S.
        • Post installation return you Region to your location
        • Reconnect to the Internet


Revisions:

August 6 2018: Initial Draft Date

August 9 2018: Initial Publish Date

Network Computers No Longer Present in File Explorer on Windows 10 1803

Summary:

How to enable network computer appearance and access in File Explorer on Windows 10 Version 1803

Comments:

  1. This blog article provides the work-around details(How To) to return the functionality of viewing networked devices/computers in Windows 10 Version 1803 File Explorer’s Navigation pane ‘Network’ folder option (Editor Note: Windows Insider Build 17133[released Mar 27, 2018] is listed as ‘Feature update for Windows 10, version 1803’, thus article also applicable to installed Insider Builds 17133 and later)
  2. Changes made by Microsoft may prevent an end-users ability to view shared devices(computers) in File Explorer’s Navigation Pane ‘Network’ folder option.
  3. The inability to view networked devices/computers in File Explorers Navigation Pane ‘Network’ option appears to be related to deprecation of the HomeGroup feature. While not all end-users have or had previously used the Homegroup preferring standard network sharing methods, the end result of HomeGroup removal and/or under-the-hood feature and/or security changes may still be one of the underlying causes.

How To:

The steps to re-enable the ability to view and access shared devices/computers are shown below and requires changing a Windows 10 1803 Services settings item called ‘Function Discovery Resource Publication’

  1. Access the Windows 10 Run dialog box via the Start Menu/Windows System/Run option or by pressing the Win + R keys on the keyboard.   Note: One can skip Step 1 and 2 and proceed to Step 3 if accessing the Services settings via search(Cllick/Tap the Windows Start Menu icon and enter ‘Services’  then click or tap on Services(Dekstop app)
  2. If using the Run dialog box – enter services.msc in the Run dialog box then press Return to load the Services dialog box window
  3. Scroll down in the Services window and select and double click/tap on ‘Function Discovery Resource Publication’ item(aka FDResPub) to access the service’s properties
  4. Change the ‘Startup type’ field entry from ‘Manual’ to ‘Automatic’
  5. In the same properties dialog box ‘Service status’ section click on Start (to start the FDResPub service)
  6. Once the status indicator shows ‘Running’ Click ‘OK’ to close the Properties dialog box, then close the Services window.

FDResPub_01

Revisions:

Mar 2, 2018: Initial Draft – Titled and written initially for Windows Insider Build 17112

Mar 8, 2018: Note added in ‘How To’ section Step 1, re-saved as 2nd Draft version

Mar 27, 2018:  Initial Publish Date; Added graphic in How To section

Mar 30, 2018: Retitled/Republished for Windows 10 Version 1803; Added Editor Note – Comments

How To Access the Windows Defender Classic User Interface

Summary:

How to access the Windows Defender Classic User Interface on Windows 10

Comments:

  1. The Windows Defender Classic UI(UI) can still be accessed using a variety of different methods in Windows 10.
  2. The same command line text content can be used for to access the Defender Classic UI via a Shortcut or Search or Run dialog box. 
  3. Microsoft replaced the Windows Defender Classic UI in Windows 10 with a new Windows Universal App(UWA) version – Windows Defender Security Center.  The new UI first appeared in Windows 10 Creators Update(Version 1703, April 2017) and continues in the Fall Creators Update(Version 1709,November 2017)
  4. The UWP app is the recommended method to access Windows 10 Defender and all the features(Threats, Definition Updates, Device Performance, and Health) included in the Windows Defender Security Center. For more information on each feature in the new UI please reference the Microsoft KB4013263 article => Protect my device with Windows Defender Security Center
  5. Accessing the Windows Defender Classic UI may provide the desired familiarity(traditional style – Home, Update, and History tabs) for end-users upgrading to Windows 10(from Windows 7/8.1 and earlier versions of Windows 10) as they transition into use and comfort with the newer Windows 10 Defender Security Center UWA.

How To:

  • Command line text for the Windows Defender Classic UI
    • C:\Program Files\Windows Defender\MSASCui.exe
  • Accessing via a Shortcut,  Search, or  Run options
    • Shortcut
        • Create a new shortcut in the location of your choice then copy the above text(shown in bold, blue above) and paste the text as the command line for the shortcut, then when prompted name the shortcut(e.g. Windows Defender Classic UI). The shortcut can be pinned to the Start Menu, Task Bar or if enabled the Quick Launch Toolbar
      • Search
        • Click the  Search icon or Seach dialog on the Task Bar then copy the above text and paste into the search field. Press Return
      • Run
        • Copy the above text and paste into the Run dialog box entry field. Note:The Run command is located o  the Start Menu under the Windows System sub menu category.

Revisions:

May 21, 2017: Initial Draft and Publish Date

Oct 31, 2017: Added links and content to Windows Defender Security Center KB article

Feb. 02, 2017: Rewritten and Re-Publish Date(revised content for clarity based on feedback requests and comments from blog follower/readers). Editor Note: Thank you Sasha, Brian, & Elise!

Default Progams – Accessing The Earlier Version User Interface Options

Summary: 

How to access the Default Programs User Interface options previously available prior to the release of the Windows 10 Fall Creators Update Version 1709

Comments:

  1. Windows 10 1709 Fall Creators Update deprecated the old style previous version ‘Default Programs’ User Interface in favor of a streamlined and condensed option.  Windows 10 1709 Default Program available configuration options are now accessed via Windows 10 Settings/Apps/Default Apps
  2. The old style pre-1709 User Interface(UI) is still accessible but with reduced functionality than previously available.
  3. The most significant change is the inability to use the old style Default Programs UI to select a program and modify its related default file type extensions and protocols.
  4. Accessing the old style UI can still be helpful by providing a familiar user interface for viewing an individual program’s quantity(number) of supported defaults and the respective supported defaults by file type extension and/or protocol 
  5. The How-To section below provides the command line code for use in creating shortcuts. The same command line code can be entered in the Run command option accessible in the Windows 10 Start Menu

  • How To:
    • Default Programs – Program selection option to view defaults by quantity and file type extension and/or protocol  (command line code shown immediately below) 
        • C:\Windows\System32\control.exe /name Microsoft.DefaultPrograms /page pageDefaultProgram
    • Default Programs – Set or Modify Default Program
        • C:\Windows\System32\ComputerDefaults.exe
    • Default Programs – File Type
        • C:\Windows\System32\control.exe /name Microsoft.DefaultPrograms /page pageFileAssoc


  • Revisions:

November 1, 2017: Initial Draft Date

November 2, 2017: Initial Publish Date

November 14, 2017: Revised ‘Comments section – numbered items; added comment #4


Windows 10–Fall Creators Update Available October 17th

Summary:  Microsoft makes Windows 10 Fall Creators Update available on October 17, 2017


Comments:

  • Windows 10 Creators Update, the next version major release for Windows 10, is now available as of 10 P.M. PDT October 17, 2017
  • Microsoft previously announced the Windows 10 Fall Creators Update would be rolled out in stages
  • A variety of methods/options are available to obtain the Fall Creators Update. The primary consumer methods are noted below. Also see the ‘How-To’ section for specific information on each method.
          • Media Creation Tool
          • Update Assistant
          • Windows 10 Windows Update (Manually check for updates)
  • The above methods are primarily intended for early adopters interested in installing the Windows 10 Fall Creator’s update in advance of the scheduled staged rollout automatically via Windows Update
    • Note: Staged rollout = Deployed automatically via Windows Update. Not everyone will receive the new Windows 10 Fall Creator bits at the same time.   If past history is an indication of timing, a staged-rollout may last for months.


How To:

  • Media Creation Tool – (Microsoft tool on the Windows 10 Software Download web page for creating Windows 10 USB/DVD media and optionally an ISO file for mounting or creating media)
  • Update Assistant
  • Windows Update
    • Windows 10 – Settings/Update and Security/Windows Update/Check for Updates)


Additional Information:


Revisions:

October 17, 2017:  Initial Draft Date

October 18, 2017:  Initial Publish Date

October 18, 2017:  Added ‘What’s New’ link in Additional Information section; final editing/correction

Windows Defender Offline – How To Run and Scan in Windows 10

Summary:  ‘How To’ select and run Windows Defender Offline in Windows 10

Comments:

  • Windows Defender Offline(WDO) is an antimalware scanning tool
  • WDO provides the ability to boot and scan the device in a trusted environment
  • WDO’s scan runs outside the normal Windows kernel and operating system
  • Scanning in a trusted environment outside the Windows kernel allows WDO to scan for and target malware that attempts to bypass the Windows shell(e.g. viruses and malware that can infect or overwrite the boot record data)
  • WDO can be run on devices using MBR(Master Boot Record) or GPT(GUID Partition Table)
  • The ‘How To’ section in this article is based on the current Windows 10 1703 version(Creators Update)
  • When WDO’s is instructed to run(required, it does not run on its own) it(and Windows) will restart the device, boot the device, pass control to WDO instead of the Windows kernel and operating system, and then perform the scan
  • WDO’s Offline scan should take less than 15 minutes when no infections are found and/or corrected
  • WDO may remove or quarantine items during its scan
    • Items removed or quarantined by WDO will be listed/shown in Windows 10 in Windows Defender’s Scan History section (located in the Windows Defender Security Center/Virus and Threat Protection/)
  • Note: To run WDO ensure Windows 10 is logged on with an Administrator account

How To:

  • Click the Windows Start Button and scroll down the alphabetical app listing and select Windows Defender Security Center
    • Optionally one can right click on the Windows Defender icon in the Task Bar Notification area and select open
  • Click on ‘Virus and Threat Protection’

WDO_01

  • Click on ‘Advanced Scan’

WDO_02

  • Select the ‘Windows Defender Offline scan’ option, then click ‘Scan Now’

WDO_03

  • Acknowledge the prompt to ‘Save your work’ do so if necessary, then click ‘Scan’

WDO_04

  • Once ‘Scan’ is clicked,  Windows 10 Creators Update Version 1703 will prompt with a User Account Control(UAC) notice dialog box requesting the user to allow changes to the computer.  Click ‘Yes’ to this required prompt to proceed with the restart process and allowing WDO to run and scan the device the necessary offline mode.

Additional Information:

Revisions:

June 26, 2017: Initial Draft Date

June 27, 2017: Final Draft Date

June 28, 2017: Initial Publish Date

Windows 10 – How to Remove and Recreate A HomeGroup

Summary:  This article shows how to remove and recreate a HomeGroup on Windows 10 for multiple devices

Comments:

  • There may be occasions where removal and recreation of the HomeGroup on Windows 10 is necessary
    • End-user desire to remove and recreate HomeGroup anew with different sharing options
    • End-user choice to reset HomeGroup to ‘off’ and require other devices to re-join the network
    • Corruption in the Windows HomeGroup service and/or related Peer Networking Service Profiles’ configuration files
    • Inadvertently deleting the HomeGroup system files (Note: Rare, but its occurred more than once)
    • HomeGroup does have a few requirements on Windows 10
      • IPV6 is required
      • Admin rights are required for the logged on user to create a Homegroup
      • Both of the Homegroup Windows Services must be running(HomeGroup Listener and HomeGroup Provider)


How-To:

On the computer that created the HomeGroup

  1. Navigate to c:\windows\serviceProfiles\LocalService\AppData\Roaming\PeerNetworking[1]
    – delete idstore.sst
  2. Navigate to Control Panel/HomeGroup
    – leave HomeGroup
  3. Go back to the above ‘ServiceProfiles’ path and delete the remaining files in that same folder
    – Repeat the exact same above steps(1, 2, 3) on any other machines on the HomeGroup network
  4. Shutdown all machines
  5. Power up the machine you wish to create the HomeGroup(leave the other devices powered down(Note: Only a machine with administrative rights [aka admin] can create a HomeGroup)
  6. Logon to Windows
  7. Open File Explorer/View/Options/View Tab
    – scroll down to ‘Use Sharing Wizard’, toggle off, Apply, toggle on, Apply, close File Explorer
  8. Navigate to Control Panel/HomeGroup
    – create the HomeGroup (follow the HomeGroup wizard instructions and configure sharing options to your personal preference)
    – The wizard will provide a password for HomeGroup access ==> Write the password down – you’ll need it on the other device(s) to join the HomeGroup
  9. Power up the other device(one at a time if more than one other device exists)
  10. Logon to Windows
  11. Open File Explorer/View/Options/View Tab
    – scroll down to Sharing Wizard, toggle off, Apply, toggle on, Apply, close File Explorer
  12. Navigate to Control Panel/HomeGroup
    – Join the HomeGroup – follow each step provided by the HomeGroup setup wizard, enter the password when requested)
  13. Shutdown the device (Optional, but if other devices exist, its best to configure each device with only the host device on the network).
  14. Repeat Steps 9 through 13 for any other devices
  15. Power up each device and verify access to the HomeGroup’s shares established by the host device.


Footnote: [1]  c:\windows\serviceProfiles\LocalService\AppData\Roaming\PeerNetworking is a Windows System/Hidden folder, it may be necessary, even with admin rights, to configure File Explorer to show ‘Hidden files’ and when accessing agree to the prompt to obtain permission to access the folder and its subfolders. (This is expected and routine in order to access and clear out any old HomeGroup service profiles


Revisions:

April 12, 2017: Initial Draft Date

April 13, 2017: Initial Publish Date

April 15, 2017:  Added note in Comments and How-To section – Admin rights for HomeGroup creation

Windows 10 – Creators Update Requires Review and Choosing Privacy Settings

Summary: Windows 10 Creators Update installation prompts to review and choose privacy settings

Comments:

  • Prior to upgrading and installing the Windows 10 Creators Update on a device the Creators Update setup will prompt/alert the user to review and choose their privacy settings
  • The review and choice selection is a required step prior to upgrading your device
  • Microsoft states this requirement is part of their continued commitment to ‘your’ privacy on Windows 10 and to make sure your privacy settings are also ready(for Windows 10)
  • The configured(chosen) privacy settings will be the privacy settings in effect after installing the Windows 10 Creators update(i.e. the choice is applicable only to the installed Windows 10 Creators Update)
  • Upon completion of the review, choosing, and saving the privacy settings the upgrade to the Windows 10 Creators Update will proceed on the device


Additional Information:


Revisions:

April 13, 2017:  Initial Draft and Initial Publish Date

April 15, 2017: Edited ‘Comments’ section for better clarity

Windows 10 – Creators Update Available April 5th

Summary:  Microsoft makes Windows 10 Creators Update available early on April 5th, 2017


Comments:

  • Windows 10 Creators Update, the next version major release for Windows 10, is now available as of April 5th
  • Microsoft previously announced the Windows 10 Creators Update would be rolled out in stages on April 11th
  • A variety of methods/options are available to obtain the Creators Update in advance of the previously announced scheduled deployment date.  The primary consumer methods are noted below. Also see the ‘How-To’ section for specific information on each method.
          • Media Creation Tool
          • Upgrade Assistant
          • Windows 10 Windows Update
          • Windows 10 Refresh option
  • The above methods are primarily intended for early adopters interested in installing the Windows 10 Creator’s update in advance of the scheduled staged rollout starting on April 11, 2017
      • Note: Staged rollout = Not everyone will receive the new Windows 10 Creator bits at the same time


How To:

  • Media Creation Tool – (Microsoft tool on the Windows 10 Software Download web page for creating Windows 10 USB/DVD media and optionally an ISO file for mounting or creating media)
    • Visit the Windows 10 Software Download web page, download and save the Media Creation Tool executable file(MediaCreationTool.exe), close all open applications, and Run the executable in Admin mode
  • Update Assistant
    • Visit the Windows 10 Software Download web page and choose the ‘Upgrade Now’ option
  • Windows Update
    • Windows 10 – Settings/Update and Security/Windows Update)
  • Windows 10 Refresh Option
    • Windows 10 – Settings/Update and Security/Recovery/More Recovery Options)


Additional Information:


Revisions:

April 6th, 2017:  Initial Draft Date

April 7, 2017:  Draft Published

April 8, 2017: Initial Publish date with final edits

Windows 10 – Media Creation Tool – Creating Installation Media

Summary:  How to create Windows 10 installation media using the Windows 10 Media Creation Tool

Comments:

  • This article provides a text and graphical overview of the steps to create Windows 10 USB installation media using the available (free) Microsoft Windows 10 Media Creation Tool
  • The information shown is for using the latest available Windows 10 Version 1607 Media Creation Tool
    • The digital signature of the latest version is ‎Thursday, ‎December ‎8, ‎2016 1:14:04 AM
  • When creating Windows 10 Version 1607 media the following media capacities are required
    • USB Flash Drive – 8 GB
    • DVD disc – Dual Layer DVD – 8.5 GB
        • Note: When creating Windows 10 media containing both 32 bit (x86) and 64 bit (x64) architectures for both both Home and Pro editions you should use USB media with a 16 GB minimum size
  • Windows 10 Version 1607 created media by design includes both Home and Pro editions
        • If desired, the option to create media for Windows 10 Home- Single Language is available, but only select this option is you are running Windows 10 Home Single Language
  • Direct link to download the Media Creation Tool (MediaCreationTool.exe)

Media Creation Process:

    1. Download and save the Media Creation Tool executable file (MediaCreationTool.exe)
    2. Right click the Media Creation Tool executable file and select ‘Run as Administrator’
    3. Connect a USB Flash Drive – As noted above an 8 GB size drive is required
    4. Accept the License Terms
    5. Choose ‘Create Installation media for another pc’; Click Next
    6. Choose a language, edition, and architecture; Click Next
    7. Select ‘USB Flash Drive’ on the ‘Choose which media to use’ page; Click Next
    8. Select and verify the correct USB Flash Drive; Click Next
    9. The tool will proceed to download, verify and create Windows 10 Version 1607 media
    10. Once Complete, the final screen will inform that your ‘USB Flash Drive ‘is Ready’

Graphical Overview of the Media Creation Process:

P1   

P2 

P3

P4

P5

P6

P7 P8 

P9

P10


Additional Information:


Revisions:

August 3, 2016: Initial Draft and Initial Publish Date

October 31, 2016:  Added more detail for clarification in the ‘Comments’ section

January 31, 2017: Added ‘Graphical Overview’ section

March 28, 2017: Rewrote entire article, added and updated information, deleted original from blog, republished

Microsoft Surface update history

Summary:   Microsoft Surface web site for the latest and past released software and firmware updates


Comments:

  • Microsoft’s Surface Update History (Software and Firmware) web site for Surface devices
  • Applies to the following Surface devices
    • Surface, Surface Pro
    • Surface 2, Surface Pro 2
    • Surface 3, Surface Pro 3
    • Surface Pro 4
    • Surface Book, Surface Book with Performance Base
    • Surface Studio
  • Direct links to obtain update history for the above Surface devices
  • Surface Updates are automatically installed via Windows Update
  • Note: Surface Updates files can also be downloaded and installed manually for most Surface devices
    • The file name format is the Surface version, followed by the operating system, followed by the release number.
    • To obtain, download and install Surface Updates manually follow the steps in this procedure

W10_Surface3_SoftFirm_01

Additional Information:


Revisions:

November 22, 2016: Initial Draft and Initial Publish Date

December 8, 2016: Revised Comment section; Added ‘Applies to’ comment

January 14, 2017:  Added example picture to better explain the multiple files available for download and installation.

Windows 10 – Windows Defender Offline

Summary:   How to Run Windows Defender Offline


Comments:

  • Windows 10 Version 1607 includes a new feature(tool) for malware removal – ‘Windows Defender Offline’
  • Windows Defender Offline is integrated into Windows 10 Version 1607
  • Windows Defender Offline performs the scan prior to Windows startup (i.e. Offline)
  • Provides the ability to remove malware and viruses that may be difficult or not capable of being removed while Windows is running


How-To:

Note: Save all work and close all applications prior to proceeding to run Windows Defender Offline

  • Steps to run Windows Defender Offline
    • Click on each in sequence
      • Start Button
      • Settings
      • Update and Security
      • Windows Defender (then scroll down to ‘Windows Defender Offline’)
      • Scan Offline

W10_WDO_01

    • After clicking ‘Scan Online’ the Windows Defender Offline process will provide an alert that Windows will shutdown in about a minute.  Once the timeout occurs, Windows will Restart
    • After the required Restart, Windows Defender will briefly show a screen indicating the scan is about to begin
    • Once the scan begins the Windows Defender Offline graphical interface will appear with a progress bar
    • The scan typically takes about 15 minutes to complete
    • Once complete, if no malware is found, the system/device will reboot
      • If malware(an infection) is found, Windows Defender Offline will provide the ability to remove the malware/infection.  
            • (Note: Windows Defender Offline, like all other Antivirus/Antimalware scanning software that runs resident and non-resident may not be able to remove all forms of malware)


Revisions:

August 3, 2016: Initial Draft Date

October 9th, 2016: Initial Publish Date

March 15, 2017:  Updated ‘Comments’ and  itemized  ‘How-To’ steps in bullet form

Windows 10 ‘Anniversary Update’ Released

Summary: 

  • Windows 10’s second major operating system update ‘Anniversary Update’ was released on Aug 2, 2016
  • Version Number and Build number as released – Version 1607  Build 14393.10

Comments:

  • Multiple Methods are available to obtain the Anniversary Update
      • Staged Rollout automatically via Windows Update(newer machines will receive the update first)
      • Manually ‘Check for Updates’ in Windows 10 Windows Update
              • Go to Settings > Updates & Security > Windows Update
              • The Anniversary Update will show up as ‘Feature Update’ with an option to update, download, and install
      • Clicking the ‘Learn More’ option/link in Windows Update
              • The ‘Learn More’ link once clicked will redirect to a Microsoft support site providing the option to download the Windows 10 Anniversary Update ISO file
      • Visit the Windows 10 Download web site/page  and click ‘Update Now’ (probably the most convenient method for end-users interested in obtaining Windows 10 Anniversary Update ASAP)

Additional Information:

  1. Windows 10 Anniversary Update Available August 2
  2. How to Get the Windows 10 Anniversary Update
  3. New Video Series This Week on Windows Highlights Windows 10 Anniversary Update
  4. Download Windows 10


Revisions:

August 2, 2016: Initial Draft and Initial Publish Date

August 19, 2016:  Updated Comment Section with link to obtain Anniversary Update via Windows 10 Download web site/page (compliments of Ed Bott’s Aug. 16, 2016 article)

The Microsoft Windows Insider Program-How to Join

Summary:   How to Join the Windows Insider Program for Windows 10

Comments:

  • A brief overview of the method join the Microsoft Windows Insider Program and install the Windows 10 Insider Program build pre-release software
  • The Windows Insider Program requires Windows 10 to be installed on the device(pc)
  • A Microsoft Account is required


    How-To:

  • Install Windows 10 on your device
  • Main Home Page URL -  https://insider.windows.com/
  • Join
    • Access the Home page URL
    • Click on ‘Sign In’ option in the upper right corner
    • Sign on by entering a Microsoft Account Username(Email Address) and Password(Required, use an existing Microsoft Account or create one), then click ‘Sign In’

imageimage

    • Click on the ‘Get Started’ dialog box to initiate the Registration process
    • Read the Program Agreement and the Privacy Statement
    • Accept the terms of agreement for  the Windows Insider Program by checking the provided box(Required)
    • Click Submit to finish the Registration process(Required)

image

  • Install Windows Insider Program pre-release version/build software
    • To obtain the Windows Insider Program Windows 10 Insider software for your device log on to Windows 10 using the same Microsoft account used to join the Windows Insider Program

    1.  Navigate via the Windows 10 Start Menu to Windows Settings
    2.  Click on Update & Security
    3.  Click on Windows Insider Program option
    4.  On the Get Insider Preview builds screen click Get started.
    5.  Click Next when presented with the Information screen explaining the cautions of using pre-release software and services
    6.  Click Confirm (another cautionary warning if leaving the program and the possibility that Windows will require a reinstallation)
    7.  Restart the PC when prompted
    8.  Upon restart navigate to the Get Insider Preview build screen
    9.  Choose the appropriate Windows Insider Program build ring(Slow or Fast)
    10. Reboot the device and check for o/s updates
    11. When the device is fully enrolled in the Windows Insider Program the desired/chosen build ring will download and install
    12. Restarts will be required during the Insider build installation process

  • Use the Windows Insider Program Feedback Hub(within the Windows 10 installed Insider Build) to provide feedback and view the latest information from the Windows Insider Team
  • Bookmark the Windows Insider Program Blog in your desired browser
  • Contribute and Monitor the Windows Insider Community Forum (Note: Use your registered Windows Insider Microsoft Account to sign in and access)


Additional Information:


Revisions:

July 2, 2016: Initial Draft and Initial Publish Date

August 8, 2016:  Revised content, Added Additional Information section

August 15, 2016:  Revised to reflect changes for Windows 10 Anniversary Update

Windows Essentials 2012 – Download (Last Chance)

Summary:  Windows Essentials 2012 Download Full Version Installer – Possibly Last Chance before being removed from the Microsoft Server

Note:  This Blog entry is now obsolete – Windows Essentials 2012 installer files are no longer available from Microsoft. 

For additional and later information see this ===>> Blog article


Comments:

  • Windows Essentials 2012 includes Windows Live Mail 2012, Photo Gallery/Movie Maker, and Windows Live Writer 2012
  • Ever since Windows 8.0 was released the possibility of the Windows Essentials 2012 suite of products no longer being available and/or not supported has been a valid concern.
  • Windows Live Essentials 2011 and 2009 Full and unified web version installers are no longer available from Microsoft web site and servers.  Windows Live Essentials 2011 and 2009 are no longer supported products.
  • Windows Essentials 2012 Full version installer remains available on the Microsoft server (How long = unknown)
  • If using one of more of the Widows Essentials 2012 suite of products, it is highly recommended to download the Full version installer for archive purposes in the event a reinstallation is necessary, clean installation on a new or different pc, and/or backup requirements.
  • It is safe to assume that Windows Essentials 2012 will not be supported in the future.  End of support does not always mean, no longer capable of being used but it does usually mean end of availability to obtain its installer files.


How to:

Note:  The Direct download link above is for the English language installer. For a different country specific version please replace the ‘en’  in the above link with the local language code.

Revisions:

July 1, 2016: Initial Draft and Publish Date

March 26, 2017:  Added Note on article obsolescence and link with further explanation

Windows 10 Update History Web Site

Summary:  Microsoft Rolls-Out Windows 10 Update History site to the public

Comments:

  • Microsoft now provides a web site for Windows 10 Update History
  • The web site acts as a hub for the Release Notes that accompany each update
  • The web site will provide information on updates in a list format(chronological descending order)
  • The web site history includes the Windows 10 Version, KB number and Build number assigned to the update.
                • e.g May 2016 Update ==> Windows 10 Version 1511, KB3156421, 10586.318
  • Each line item in the list has a clickable link to its respective ‘Help article’ providing additional information
  • Each Help article also has a separate link to the respective update’s KB article. 
  • The Linked KB article in addition to details also contains a File Information section which provides a link to download a csv file containing a list of the updated files(File name, File version, File size, Date, Platform).  [Note: The csv file can be opened and viewed in Excel(recommended) or a standard Text editor]

How To:

Revisions:

February 14, 2016: Initial Draft Date

March 15, 2016: Final Draft Date – Updated Comment section noting web site provides chronological update history

June 6, 2016:  Initial Publish Date

July 1, 2016: Updated comment section to include information on KB article and File Information availability

July 2, 2016: Rearranged bullet-ized items in the Comments section and corrected typographical errors

Windows 10 – Media Creation Tool Updated with February 2016 Build bits

Summary:   Windows 10 Media Creation Tool(MCT) for creating installation media(USB/DVD/ISO) now includes the latest February 2016 bits

Comments:

  • Microsoft updated the Windows 10 Media Creation Tool for Windows 10 Version 1511 with the latest available ‘Build’ bits(February 2016)
  • Previous bits were November 2015 – Windows 10 1511 RTM Build 10.10586.0
  • February bits – Windows 10 Version 1511 – Build 10.10586.122
  • Media Creation Tool link
  • The downloadable Media Creation Tool filename is MediaCreationTool.exe
    • To create USB media – Run the executable file and when prompted choose the USB option
    • To create DVD media – Run the executable file and when prompted choose the ISO option and burn the ISO file to DVD with your preferred software (Note: Windows 10 has a built-in support to create the DVD from the ISO file)
    • Optionally, if desired, the ISO file can also be mounted
  • The created installation media(or mounted ISO file)  can be used to upgrade from Windows 10 Version 1507 or Windows 10 1511(pre-February bits) and also clean install Windows 10 Version 1511.

Revisions:

February 29, 2016:  Initial Draft and Publish Date

March 2, 2016:  Added comment for ISO file mounting

March 15, 2016:  Added comment for include Media Creation Tool filename

March 16, 2016: Rearranged comments for flow

Windows 10 – DISM Tool for Checking and Repairing a Windows System Image

Summary: 

  • How to use the Microsoft DISM Tool to Check, Scan and Restore Windows 10 System Image Health

Comments:

  • DISM(Deployment Image Servicing and Management [DISM.exe]) is a command-line tool that can be used to determine the status[Health] of the Windows operating System Image’s Component Store.  The tool can also be used to Repair a Windows System Image
  • DISM’s command-line tool is run in an elevated command prompt
  • DISM is also available via PowerShell.  (Note: This article will not cover using DISM’ with PowerShell)
  • This article covers three(3) of the command line switches available for use with the DISM command
    • /CheckHealth  – Scans and reports if the System Image is healthy, corrupted, repairable, or non-repairable
        • Informative Only, Doesn’t Fix, Repair or Change
    • /ScanHealth – Scans and reports if corruption exists
        • Informative, Doesn’t Fix, Repair or Change (This scan will take several minutes and will provide a progress bar showing % progress – Do not interrupt)
    • /RestoreHealth – scan the Windows Image for component store corruption and automatically perform repairs
  • Use the DISM tool to determine the health of the Windows System Image if the built-in Windows System File Checker can not repair Windows file corruption.
  • If the DISM tool’s CheckHealth and ScanHealth options report the image (a) corruption **and** (b) is repairable, then use the DISM tools /Restore Health option.

How To: 

  • Using DISM’s /CheckHealth or /ScanHealth  option
  1. Open an Elevated Command Prompt => Press Windows key + X ] then select the ‘Command Prompt (Admin) option
  2. At the command line prompt enter one of the following
              • DISM /Online /Cleanup-Image /CheckHealth
              • DISM /Online /Cleanup-Image /ScanHealth
        • Note: A healthy system, i.e. no component store corruption will report findings as shown in the two pictures shown below

W10_DISM-CH_01 

 W10_DISM-SH_01

  • Using DISM’s Restore Health option (Note: Always perform a /CheckHealth and /ScanHealth prior to attempting a repair of the Windows System Image and ensure that the /CheckHealth option reports the image as repairable)
              • DISM /Online /Cleanup-Image /RestoreHealth


Additional Information:


Revisions:

January 6, 2016: Initial Draft and Publish Date

May 8th, 2016:  Updated and revised Comments section description of the command line switches

August 15, 2016:  Replaced example pictures for better view-ability

September 9, 2016: Added reference to using DISM for Windows Update errors caused by component corruption

Windows 10 Media Creation Tool

Summary:   Microsoft tool to create Windows 10 installation media (DVD or USB) or ISO file

Comments: 

  • The Microsoft Media Creation Tool is free downloadable software(*.exe file) that can be run and used by end-users to:
        • Create Windows 10 installation media on a DVD disc, USB Thumb Drive or an ISO file for mounting
        • Upgrade the PC to Windows 10
  • Where to obtain – https://www.microsoft.com/en-us/software-download/windows10
        • Click on the above link to load the Microsoft web site and the option to download the Media Creation Tool
        • Scroll down and click on the box ‘Download tool now’(see below)

W10_MCT_01

        • Save the *.exe file (MediaCreationTool.exe) to your local storage(hard drive, usb thumb drive)
        • Run the exe file to create Windows 10 installation media or upgrade to Windows 10


Additional Information:


  • Also, another good resource on clean installing Windows 10 can be found in Microsoft MVP(Greg Carmack) WIKI


Revisions:

October 30, 2015: Initial Draft and Publish Date

October 31, 2015: Added Additional Information section and links

Windows 10 – Free Upgrade Information

Summary:

Windows 7 SP1 and Windows 8.1 upgrade options for Windows 10

Comments:

Upgrade options:

  • Reserve a free upgrade for Windows 7 SP1 and Windows 8.1 Update devices via the ‘Get Windows 10’ upgrade app icon in the lower right side of the Windows Task Bar.
  • Buy a new Windows 8.1 device and upgrade it for free to Windows 10
  • Note: Windows 7 SP1 and Windows 8.1 users have until July 29, 2016 to take advantage of the free Windows 10 Upgrade offer
  • Get Windows 10 Upgrade app (graphic)

Win10_GetApp_01

Additional Information:

1.  Upgrade to Windows 10 For Free

https://www.microsoft.com/en-us/windows/windows-10-upgrade

2.  Windows 10 Questions and Answers (FAQ’s – Frequently Asked Questions)

https://www.microsoft.com/en-us/windows/windows-10-faq

3. Windows 10 upgrade via Windows Update is expected to be a download about 3 GB in size.

4.  Reserving Windows 10 via the ‘ Get Windows 10’ app will generate a compatibility report for devices and applications indicating if the device and installed applications are compatible with Windows 10

http://windows.microsoft.com/en-us/windows/what-compatiblity-report-means

5. The ‘Get Windows 10 app’ will place an icon in the lower right of the Windows Task Bar

6.  Reserving will place your device in a Microsoft Windows 10 upgrade queue for later download and install.

Revisions:

June 1, 2015: Original Draft and Publish Date

June 9, 2015: Added link for ‘What Compatibility Report Means’

Expanding Conversation View Settings in Windows Live Mail

Summary:


How To:

1. Open Windows Live Mail

2. Click Blue button (upper left), Options, Mail, Read tab
– check ‘Automatically expand grouped messages’

3. Click the View tab (tabs are located on the Ribbon to the right of the Blue button))

Suggested settings on the View tab
Filter Messages = Show all
Conversations = On
Sort Order = Descending
Sort by = Sent
Message List = Automatic
Reading Pane = Right of message list and Show header
Calendar pane = Off (setting is a toggle)
Compact View = Off (setting is a toggle)
Storage Folders = On (setting is a toggle)
Status Bar = On (setting is a toggle)


Revisions:

August 3, 2013: Original Draft

September 7, 2013: Original Publish Date

December 7,  2013: Updated to itemize View tab recommended settings

Phishing in the Microsoft Windows Live Hotmail Pond

Summary:

A variety of email phishing methods are employed in an attempt to harvest Hotmail usernames and  passwords. Phishing attempts may give the impression that the source of the email actually originated from Microsoft.

Background:

A phishing attempt is a form of identity theft (an attempt to obtain *your* personal information). The example below shows a fake email message attempt to obtain (phish) your Hotmail username and password.

HM_PhishScam_00

The message may have been delivered through the Hotmail servers (arriving in your Inbox) but not actually originating from Hotmail or Microsoft.

Inspection of the message’s headers often provides many clues on the source and location of the fake message. The example below highlights (within red triangle)  a few of these clues.

HM_PhishScam_02

Also of importance the message header’s content may be falsified by the originating phishing source.

How To:

 To view the message source/headers of a message received  in your Hotmail account in the Hotmail web user interface.

  • Single or Double Click on the message (to display it)
  • Look in the upper right of the message for the ‘Reply’ option
  • Click on the downward arrow adjacent and to the right of the ‘Reply’ option
  • Scroll down and select ‘View Message Source’

Comments:

  1. First and foremost – Be careful out there!  If uncertain, be suspicious.
  2. For additional knowledge and information see these Microsoft articles.

Email and Web Scams: How to help protect yourself

http://www.microsoft.com/security/online-privacy/phishing-scams.aspx

Win the Battle against email fraud

http://blogs.msdn.com/b/securitytipstalk/archive/2012/03/20/win-the-battle-against-email-fraud.aspx

How to recognize phishing email messages, links or phone calls

http://www.microsoft.com/security/online-privacy/phishing-symptoms.aspx

Revisions:

May 15, 2012:  Draft version

May 21, 2012: Original Publish Date

June 8, 2012: Added comments and ‘view message source’ instructions for the Hotmail web interface

How To Install Windows Live Essentials 2011

Summary:

Overview and explanation of the Windows Live Essentials 2011 installer’s choices for installing all or selective Windows Live Essentials 2011 applications and optional components on Vista Sp2, Windows 7, Windows Server 2008 Sp2 R2 and Windows 8 Consumer Preview

Installation Process and Choices:

The Windows Live Essentials 2011 (WLE 2011) installer will first notify that is it ‘preparing to install’WLE_QFE3_02

Once preparation is complete the installer will provide two installation choices:

  1. Install all of Windows Live Essentials”  = Install ‘Everything’ (a minimum of 8 to a maximum of 12 applications and optional programs)
  2. Choose which programs you want to install” = User option to selectively install 1 or more items (Custom mode)

WLE_QFE3_03

If comfortable with Microsoft’s’ recommendation to ‘Install all’ select the first option, allow the installer to finish until completion and begin using one or more of any application (fyi – upon completion Windows Live Messenger will automatically be loaded)

On the other hand if preferring the ability to decide which applications will be installed (since many users may not need or want the full compliment of included applications) then select the second option ‘Choose the programs you want to install’.

It is extremely important to note that even when choosing the second option all programs are ‘pre-checked’ to be installed (i.e. you must ‘Opt-Out’ of any application or it will be installed).  The graphic below contains additional text added by this writer reiterating the need to ‘Uncheck’ any program in order to prevent installation.

WLE_QFE3_05

An example of a more typical selection of the six primary WLE 2011 application programs (Messenger, Mail, Photo Gallery, Movie Maker, Writer, and Mesh) is shown below (at least one program must be chosen).

WLE_QFE3_06

Once the ‘Install’ button is clicked the installation process will provide a ‘completion status’ until ‘Done!’

WLE_QFE3_07 WLE_QFE3_08

WLE_QFE3_09 WLE_QFE3_10

WLE_QFE3_11 WLE_QFE3_12

WLE_QFE3_13  WLE_QFE3_14

Once the installation is ‘Done!’, click the Close Button, Shutdown/Restart (even if not prompted) and start using any of the installed Windows Live Essentials 2011 programs.

Comments:

  • The Outlook Connector Pack includes the Outlook Hotmail Connector and the Windows Live Messenger Provider for the Outlook Social Connector. The latter is only installed if the Outlook Social Connector is already installed.
  • The Outlook Social Connector is included in Office 2010 and available (as a download) for Outlook 2003/2007.
  • Windows Live Downloads – link to obtain the latest WLE 2011 installer (full or web version)
  • Windows Live Essentials 2011 Version Numbers – link itemizing version numbers for WLE 2011 individual applicationprograms
  • WLE 2011 requires Vista Sp2, Windows 7, Windows Server 2008 Sp2 R2 or Windows 8 Consumer Preview.
  • WLE 2011 can also be installed on Windows 8 Consumer Preview though prior to installation it is highly recommended to  first enable .NET 3.5 (includes 2.0, 3.0 and 3.5) in Windows 8 Consumer Preview. To enable .NET 3.5  see:  Installing the .NET Framework 3.5 on Windows 8 Consumer Preview 
  • This blog article was written due to the large number of questions (always welcomed) received via E-mail and Instant Messaging regarding the applicability/compatibility of installing WLE 2011 as a supplement and/or alternative to the current available Windows 8 Consumer Preview ‘Apps’. Also special thanks to Amber for providing the MSDN Windows 8 .NET 3.5 install link.

Revisions:

March 27, 2012: Original Publish Date

MSN Phasing out Chat and E-mail Support For Subscription Plans


Summary:

Effective April 30, 2012 MSN will phase out support via Chat and e-mail for MSN subscription (fee-based) customers


Subscriber Notification:

  • Email notice of March 19, 2012

MSN_SupportEnd_00

Current Options Impacted:

MSN_SupportEnd_01    MSN_SupportEnd_02


Comments:

  • Support can be obtained now and in the future in the MSN Solution Centerhttp://answers.msn.com  MSN_SupportAnswersMsnCom_01
  • This change impacts MSN Subscribers (fee based) using MSN Dial-Up or Premium Internet Software Plans
  • The Chat and E-Mail Support options at https://support.msn.com will no longer be available
  • The notification does not mention removal of ‘Customer Service Phone Support’ which is expected to remain available for billing, cancellation etc. purposes

Revisions:
March 19, 2012: Original Draft Date
March 22, 2012: Original Publish Date

Windows Live Downloads – Version 2

Windows Essentials 2012 and Windows Live Essential 2011 & 2009 downloads are no longer available from the Microsoft servers.  This article’s content has been updated to reflect the end of availability and support and only present for archival and search purposes and to inform the lack of availability of the program(s) on Microsoft Servers.

Also see my related article.


Summary:

  • Links to download the current version (now called) Windows Essentials 2012 applications/programs – no longer available from Microsoft
  • Links to download the 2011 version of the Windows Live Essentials 2011 applications/programs – no longer available from Microsoft
  • Links to download the 2009 version of  the Windows Live Essentials 2009 applications/programs – no longer available from Microsoft
  • Links to download earlier versions (Windows Live Essentials 2008) – no longer available from Microsoft

Links:

  • Windows Essentials 2012 (note name change)
    • Download links for 2013 are for build QFE4 released May 10, 2014(final version)
    • System Requirements and Release Notes for 2012 (suggested reading
  • Windows Live Essentials 2011 
    • Download links for 2011 are for build QFE3 released March 2012
  • Windows Live Essentials 2009
    • Download links for 2009 are for build QFE3 released May 2010

Direct download to Microsoft server for the installer executable file

Full version 2012 installer
http://g.live.com/1rewlive5-all/en/wlsetup-all.exe

Web Version 2012 Installer – English Language Version
http://g.live.com/1rewlive5-web/en/wlsetup-web.exe

Full Version 2011 Installer – English Language version
http://g.live.com/1rewlive4-all/en/wlsetup-all.exe

Web Version 2011 Installer – English Language Version
http://g.live.com/1rewlive4-web/en/wlsetup-web.exe

Note: Direct download links above are for the English language installer. For a different country replace the ‘en’ with the local language code.

System Requirements (2012 version) -suggested reading
http://windows.microsoft.com/en-US/windows/Windows-Essentials-2012-system-requirements

Release Notes (2012 version)  – suggested reading
http://windows.microsoft.com/en-us/windows/essentials-2012-release-notes

Older version (2009):

Windows Live Essentials 2009  (Earlier version no longer available primarily intended for Windows XP  and Server 2008 compatibility (not recommended for use on Vista, Windows 7/8x/10)

Direct download to Microsoft server for the installer executable file
Full Version Installer English Language version
http://g.live.com/1rewlive3/en/wlsetup-all.exe
Web Version Installer – English Language Version
http://g.live.com/1rewlive3/en/wlsetup-web.exe

Note: Direct download links above are for the English language installer. For a different country replace the ‘en’ with the local language code.


Comments:

Windows Essentials 2012

1. Initial version released August 7, 2012 (Build 16.4.3503.0728);

2. QFE1 version released Sept 27, 2012 (Build 16.4.3505.0912)

3. QFE2 version released May 14, 2013 (Build 16.4.3508.0205)

4. QFE3 version released, digital signature January 23, 2014 (Build 16.4.3522.10)

5. QFE4 version released, digital signature April 7, 2014 (Build 16.4.3528.0331)

  • No longer available, removed from Microsoft Servers

6. Does not include Live Mesh (Sky Drive Desktop app replaces Live Mesh)

7. Will remove Live Mesh if installed

8. Will remove Messenger Companion if installed

9. Photo Gallery and Movie Maker rebranded as Windows Photo Gallery and Windows Movie Maker. No change in branding to the names for Windows Live applications (Mail, Messenger, and Writer)

8. Update  primarily for Photo Gallery and Movie Maker (both programs install as one package)

9. Windows Update KB 2741355 is a pre-requisite for DirectX 9 support in Movie Maker on Windows 7 or Windows Server 2008 R2 systems.

10. Windows Live Messenger deprecated (as of April 2013 for all locations except mainland China) but remains included in the installer.  Windows Live Messenger has been replaced by Skype.

If Messenger is installed then after first use a prompt to upgrade to a ‘new version’ of Messenger will appear. The ‘new version’ is Skype.  Thereafter Messenger will cease to function (logon failure, won’t/cease to open)

Upgrading to Skype will uninstall Messenger. Messenger can also be uninstalled manually via the Control Panel (Programs and Features/Windows Essentials 2012)

Windows Live Essentials 2011 (Wave 4)

1. Initial Version RTW released Sept 30, 2010

– Build Number 15.4.3502.0922

– c.f. Windows Live Essentials 2011 available for download

2. QFE1 Version RTW released Dec 1, 2010

– Build Number 15.4.3508.1109 ( Windows Live Mesh and Family Safety not updated)

– no GUI changes, no official update notice  available on Windows Live Team site

– Full and Web Installers did not require/receive a build number update

3. QFE2 Version RTW released July 7, 2011

– Build Number 15.4.3538.513  (Installer) – See #5 below for link to build number by program

– Windows Live  Team QFE2 update notification and overview  of  changes

4. QFE3 version RTW released on March 20, 2012 (Final Version, no future updates)

– Build Number 15.4.3555.308  (Installer)

5.  Note: Windows Live Messenger deprecated April 2013 (logon failure, won’t open, uninstall via Control Panel/Programs and Features)


Windows Live Essentials 2009 (Wave 3)

1. Last/Final 2009 version (QFE3) was released May 12, 2010

2. QFE3 is the last planned update for Windows Live Essentials 2009 (Wave 3)

3. Last version to support Windows XP

4. Support for the 2009 version will continue for the ‘foreseeable future’

  • The ‘foreseeable future’ does not mean ‘in perpetuity’; XPSp3 Extended Support ends Apr. 2014
  • The ‘foreseeable future’ may not mean until the end of XPSp3 Extended Support(i.e. Plan ahead)

5. Note: Windows Live Messenger deprecated as of April 2013 (logon failure, won’t open, uninstall via the Control Panel/Add-Remove Programs)

Revisions:

March 20, 2012: Original Publish Date

March 26, 2012:  Revised title and published as new blog entry to supersede (not replace) earlier searchable entry.

August 7, 2012: Updated to include information on release of Windows Essentials 2012

October 7, 2012: Updated for Windows Essentials 2012 QFE1;  Added noted for Movie Maker/DirectX 9 support on Windows 7 and Windows Server 2008 R2 (KB 2741355 pre-requisite)

May 15, 2013: Updated for Windows Essentials 2012 QFE2; Added comment on Messenger deprecation and necessary upgrade/replacement by Skype.

Oct 13, 2013: Removed obsolete links; updated content for current status

May 22, 2014: Updated for Windows Essentials 2012 QFE4

March 26, 2017: Added leading note on lack of availability from Microsoft for all Windows Essentials and Windows Live Essentials applications


Windows Live Hotmail – How To Close A Hotmail Account

Summary:

  • A Hotmail type account can only be closed by a valid Windows Live ID owner
  • Closure requires use of the Windows Live ‘Close Your Account’ tool
  • Closure requests are only finalized after 9 months (270 days) of inactivity

Background Information:

  • Due to security reasons only valid holders of a Windows Live ID can close a Hotmail account
  • Hotmail type accounts are of the form – Hotmail.com, Live.com, Msn.com and other country specific derivatives of  the same or similar domain (e.g. Hotmail.ca, Live.nl, Msn.co.uk etc.) Note: The terms ‘Hotmail account’ and ‘Hotmail type account’ are used interchangeably in this article (they are one and the same)
  • Account closure occurs in stages (closure request, message removal from the Hotmail server, refusal of incoming mail to the Hotmail server, and eventual/final closure ‘after’ 270 days of inactivity/use of the account)
  • Closing a Hotmail type account does not close a Windows Live ID account. The Windows Live ID account will be deleted after 365 days of inactivity.
  • The method shown below in the How To: is not applicable for 3rd party email addresses registered as a Live ID
  • The method shown below in the How To: is not applicable to subscription based accounts (Hotmail Plus or MSN Premium/Premier) until the account is cancelled and converted to a free Hotmail type account (contact Customer Service to cancel the subscription and convert the account to a free Hotmail type account).

How To:

1. To Close a Hotmail type account access the ‘Close Your Account’ tool  by first signing-in using the account’s Windows Live ID username and password (see below picture).

The url address for the ‘Close Your Account’ tool is:

http://mail.live.com/mail/CloseAccountConfirmation.aspx?

HM_CloseAcct_00

2. After ‘Sign in’ click the ‘Close your Account’ option

HM_CloseAcct_02

  • Note the 270 day required inactivity (subsequent use of the Hotmail account will cancel the closure request and reactivate the account)
    3.  Once the account closure request is processed, the user will receive the following prompt

HM_CloseAcct_03

4. Thereafter Do Not Use the Account  for 270 days since use of the account will reactivate the Hotmail type account, nullify the original closure request and require the valid account holder to repeat the entire account closure process.

Comments:

  • The Windows Live ID associated with the Hotmail account will not be closed after 270 days of account inactivity
  • The Windows Live ID associated with a Hotmail account will only be deleted after 365 days of inactivity from the date of a valid account closure request. (After 365 days the Live ID username may be available for your or another’s use.  Fyi – the term ‘may be available’ should not be interpreted in the absolute sense).
  • The ‘Close Your Account’ dialog box mentions that a  Hotmail email address may be available for reuse after 270 days of inactivity. Since it takes 365 days (or even longer) for a Live ID (also your email address) to be deleted it would seem doubtful that ‘available for reuse’ has any practical meaning until at least 365 days of inactivity.

Supplemental Information:  (What Not To Do)

(Note: editor/winston) This section ‘Supplemental Information: What Not To Do’ was included for one primary reason. Searching the internet (Google, Bing, etc) yields a variety of articles with directions explaining ‘How to close a hotmail account’ – while some are valid,  too many have not been updated with current data (270 day inactivity requirement – some reference 120 days; pointing to the Live ID account information page – reason explained below; not differentiating or explaining the difference between a Hotmail account, Live ID account and/or 3rd party Live ID accounts)

  • Do not use the ‘Close your account’ option available on the bottom of the Live ID Account information page (https://account.live.comto close a Hotmail type account.  This option can be used for closing a third party email address registered as a Live ID, i.e. no Hotmail account/Inbox – e.g. yahoo.com, gmail.com, your-isp.com or similar email addresses which can be registered as a Live ID)

HM_AcctInfoCloseOption

a. Attempting to use the Live ID Account information  ‘Close your account’ option for a Hotmail account will yield the following page/prompt (as promising as the notice may appear to be, for a Hotmail account, it will not work)

HM_CloseLiveIDAcct_00

b. Subsequent entry of an active Hotmail Windows Live ID and clicking ‘Yes’ generates the following page/prompt [Cannot close] for a Hotmail type account.

HM_CanNotCloseLiveAcct_01

Reference Material:

Revisions:

May 21, 2011: Original Draft Date

May 23, 2011: Original Published Date