Installing Windows Live Mail 2012 On Windows 10

Summary:  How to Install Windows Live Mail 2012 on Windows 10

Comments:

  • Installation on Windows 10 requires the Windows Essentials 2012 Full Version Installer
    • The web based installer version can not be used since the install will attempt to download files from a no longer existent server and the installation will fail in a few seconds.
    • If not having previously archived the Windows Essentials 2012 full version installer your only options are to obtain the full version installer from an alternate source(friend, neighbor, colleague, 3rd party site on the internet that may be hosting the full version installer)
    • The full version installer:   (English version)
            • Filename is wlsetup-all.exe
            • File version is 16.4.3528.331
            • File Size is 134, 112 KB(130MB)
            • Digital signature date‎  is Monday, ‎April ‎7, ‎2014 12:09:33 PM
  • Requires .NET 2.0
  • If installing the English version in a country different than the United States see the precautionary ‘Special Instructions:’ Note(in red) below.

Procedure:

  1. Obtain the full version installer
  2. Install .NET 2.0 by enabling .NET 3.5 in Windows 10 Program and Features/’Turn Widows features on or off ‘ then Check the box adjacent to .NET Framework 3.5(includes .NET 2.0 and 3.0).  Click OK.  Close Programs and Features. This step is mandatory — .NET 2.0 must be installed prior to running the installer program executable.
  3. Run the full version installer in Administrator mode(Rt. Click and choose ‘Run as Administrator’
  4. When prompted – Select the option titled – ‘Choose the programs you want to install’
  5. Select ‘Mail’
  6. Click ‘Install.   Do not interrupt the installation. 
  7. Once the installation is complete, the program will/may run and prompt to setup an email account. Set up your email account or cancel and setup later.  When setting up an email account it would be prudent to do it manually by choosing the ‘Manually configure server settings’ option.   Important -  if setting up an Outlook.com type email account(Outlook/Live/Hotmail/MSn.com) ensure setup is done manually and only choose the IMAP or POP protocol. Do not choose/use the ‘Windows Live Hotmail’ option since that choice will attempt to use the Http(DeltaSync) protocol which is no longer supported by the backend Office 365 Platform server.


Special Instructions:

  • Note:  Using the English language full installer version in a country different than the United States
        • If installing the English language version in a location(different country) than the U.S. additional steps  must be taken for a successful installation
        • Disconnect from the Internet
        • Navigate in Windows 10 to Settings/Time and Language/Region and change to U.S.
        • Post installation return you Region to your location
        • Reconnect to the Internet


Revisions:

August 6 2018: Initial Draft Date

August 9 2018: Initial Publish Date

Windows Essentials 2012– Installer File Officially Removed from Microsoft Servers

Summary:  Microsoft officially removed the ability to download the Windows Essentials 2012 Full Version installer file from their servers.


Comments:

  • Last week Microsoft officially discontinued the ability for end-users to obtain(download) the Full version installation file for Windows Essentials 2012. (The web version installer was removed some time ago)
  • The removal of the installer file has been expected since Microsoft ended all support for Windows Essentials 2012 in January 10, 2017.   Windows Live Essentials 2011 and 2009 installer files were removed and ceased support quite some time ago.
        • End of support means no further updates(patches/fixes/compatibility), no security updates, no Junk Mail filter updates, and no support for use on current Microsoft supported operating systems(Windows 7/8.1/10)
  • The Windows Essential 2012 installer file may be available from other avenues(friends, third party sources) though caution is warranted from obtaining installation files from outside sources.
          • [Editor note: Not recommended and proceed at your own risk]
  • It would be prudent, if still using a Windows Essentials 2012 products(Mail, PhotoGallery/Movie Maker, Writer) to consider investigating and/or switching to an alternative program for your computing needs and experience.
        • Continued use of Photo Gallery(which is primarily a Photo Viewing application with some editing capability) may be acceptable from a risk standpoint
        • Open Live Writer, compliments of Microsoft, a replacement for Writer remains available as an open source program and has been since 2015
        • Windows Live Mail and its continued use as a mail/news client is feasible but do note that no future security updates will ever be released for the product(nor have any been released for some time) or definition updates for its built-in Junk Mail filter thus always practice safe computing when opening/previewing email and ensure a resident Anti-virus/Anti-malware client is running on your chosen operating system(e.g. Windows Defender on Windows 10)
  • It would also be a good idea to consider archiving any important data to an external source outside of Windows Essential application programs(e.g. email messages and Contacts exported/backed-up to an external thumb or hard drive).
  • FYI – The Windows Essentials suite of products (fka Windows Live Essentials) had a lifespan of just short of 10 years(first released in May 2007 as ‘Windows Live Installer’ comprising of the unified(web based) installers for Messenger, Mail, and Writer)


Revisions:

March 24, 2017: Initial Draft Date

March 26, 2017: Initial Publish Date

Windows Essentials 2012 – Download (Last Chance)

Summary:  Windows Essentials 2012 Download Full Version Installer – Possibly Last Chance before being removed from the Microsoft Server

Note:  This Blog entry is now obsolete – Windows Essentials 2012 installer files are no longer available from Microsoft. 

For additional and later information see this ===>> Blog article


Comments:

  • Windows Essentials 2012 includes Windows Live Mail 2012, Photo Gallery/Movie Maker, and Windows Live Writer 2012
  • Ever since Windows 8.0 was released the possibility of the Windows Essentials 2012 suite of products no longer being available and/or not supported has been a valid concern.
  • Windows Live Essentials 2011 and 2009 Full and unified web version installers are no longer available from Microsoft web site and servers.  Windows Live Essentials 2011 and 2009 are no longer supported products.
  • Windows Essentials 2012 Full version installer remains available on the Microsoft server (How long = unknown)
  • If using one of more of the Widows Essentials 2012 suite of products, it is highly recommended to download the Full version installer for archive purposes in the event a reinstallation is necessary, clean installation on a new or different pc, and/or backup requirements.
  • It is safe to assume that Windows Essentials 2012 will not be supported in the future.  End of support does not always mean, no longer capable of being used but it does usually mean end of availability to obtain its installer files.


How to:

Note:  The Direct download link above is for the English language installer. For a different country specific version please replace the ‘en’  in the above link with the local language code.

Revisions:

July 1, 2016: Initial Draft and Publish Date

March 26, 2017:  Added Note on article obsolescence and link with further explanation

Expanding Conversation View Settings in Windows Live Mail

Summary:


How To:

1. Open Windows Live Mail

2. Click Blue button (upper left), Options, Mail, Read tab
– check ‘Automatically expand grouped messages’

3. Click the View tab (tabs are located on the Ribbon to the right of the Blue button))

Suggested settings on the View tab
Filter Messages = Show all
Conversations = On
Sort Order = Descending
Sort by = Sent
Message List = Automatic
Reading Pane = Right of message list and Show header
Calendar pane = Off (setting is a toggle)
Compact View = Off (setting is a toggle)
Storage Folders = On (setting is a toggle)
Status Bar = On (setting is a toggle)


Revisions:

August 3, 2013: Original Draft

September 7, 2013: Original Publish Date

December 7,  2013: Updated to itemize View tab recommended settings

Windows Live Mail – Contacts Database

Summary: 

  • A technical overview of  Windows Live Mail Contacts database two different modes of operation(without and with the use of a Live ID) and each mode’s respective database filename/local storage location(s)

Background:

§  Windows Live Mail(WLM) provides two modes of operation

a)     Default   [Offline]           –    no sign-in to Windows Live

b)    Live ID   [Online]            –    sign-in to Windows Live

§  WLM only operates in one mode (a) or (b) at a time

§  Each mode (a) or (b) has its own contacts when viewed in WLM

§  Each Live ID used to sign-in for mode(b) has its own contacts when viewed in WLM

§  Each mode (a) or (b) has a unique(independent) contacts database

§  Each Live ID used to sign-in for mode (b) has a unique(independent) contacts database

§  Contacts and Contact databases are not shared across modes or Live ID’s

§  Contacts database(s) are stored on the hard drive within the user’s Windows profile

Database Name and Location:

§  The Contact database(which holds the entire contact list) filename is ‘contacts.edb’’

§  Each mode (a) or (b) will have a unique(independent) contacts.edb file (same name, different location)

§  Each Live ID used in mode (b) will have a unique(independent) contacts.edb file

Default(Offline) – Mode (a)

§  The Default(Offline) Contact database file(contacts.edb) is stored in a hidden subfolder called DBStore. *** To view the DBStore folder –> configure Windows Explorer to ‘Show hidden files/folders and protected operating system files’

§  Full folder pathname for the Default(Offline) contact database for WLM version 2011 and 2009 are shown below for the respective Windows operating system(o/s)

 Windows Live Mail 2011  (pre QFE3 versions) – Windows 7 or Vista

 Path –> C:\Users\<windows username>\AppData\Local\Microsoft\Windows Live\Contacts\default\15.4\DBStore

Click Here —> To see a Windows Explorer view  of WLM 2011 Pre QFE3 Default Database Folders

Windows Live Mail 2011  (QFE3 version) – Windows 7 or Vista

 Path –> C:\Users\<windows username>\AppData\Local\Microsoft\Windows Live\Contacts\default\15.5\DBStore

Note: The ‘Default’ DBStore folder  is a hidden subfolder of the ‘15.5’ folder

Click Here —> To see a Windows Explorer view of the WLM 2011 QFE3 Database Folders

Windows Live Mail 2009 (see notes below)

·         Windows 7 or Vista

Ø C:\Users\<windows username>\AppData\Local\Microsoft\Windows Live Contacts\{0a1c1d7e-4a67-4693-bd70-1ba1490ddac8}\DBStore

WLM_ContactsDB_2009

·         Windows XP

Ø C:\Documents and Settings\<windows username\Local Settings\Application Data\Microsoft\Windows Live Contacts\{0a1c1d7e-4a67-4693-bd70-1ba1490ddac8}\DBStore

Notes: (only applicable to WLM 2009)

ü  The numerical 16-digit hexadecimal number ( GUI {0a1c1d7e…) shown(above) for WLM 2009 is randomly generated by WLM and will be different on each pc/operating system.

ü  To determine the numerical name assigned to  the Default(Offline) mode contact database folder in WLM 2009 one must reference the following registry key’s ‘Name’ and ‘Data’ fields values.

HKEY_CURRENT_USER\Software\Microsoft\Windows Live Contacts\Database

ü  The Name field in the above registry key ‘indicates’ the pathname of ‘Default’ root folder. The pathname shown when viewed in the registry is a ‘slight misdirection’ (but fully understood by the Windows operating system)

-The registry key ‘Name’ value will show:

Windows 7 or Vista:

 C:\Users\<windows username>\Contacts\Default
XP:

 C:\Documents and Settings\<windows username>\Contacts\Default

-Though the Default(Offline) folder is actually one subfolder below the following:

Windows7 or Vista:

  C:\Users\<windows username>\AppData\Local\Microsoft\Windows Live Contacts

XP:

 C:\Documents and Settings\<windows username\Local Settings\Application Data\Microsoft\Windows Live Contacts

ü  The registry key ‘Data’ value completes the pathname by showing the subfolder value(i.e. the numerical 16-digit hexadecimal number) that contains the Default(Offline) DBStore folder and its respective contacts.edb file.

Live ID (Online) – Mode (b)

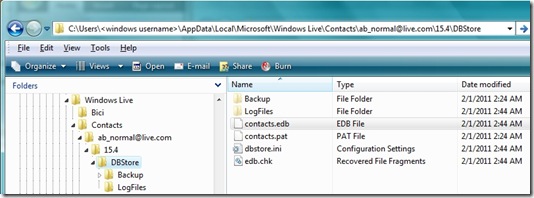
§  The Live ID(Online) Contact database file(contacts.edb) is also stored in a hidden subfolder called DBStore.

§  Each Live ID’s Contacts folder in WLM 2011(unlike WLM 2009) uses the Live ID email address(e.g. ab_normal@live.com)  thus WLM 2011’s approach improves upon WLM 2009’s method by not requiring the registry key or use of a numerical hexadecimal named folder thus making the folder much easier to find in Windows Explorer

§  Full folder pathnames for a Live ID(Online) contact database for WLM version 2011 and 2009 are shown below for the respective Windows operating system(o/s)

Windows Live Mail 2011  (pre QFE3 versions) – Windows 7 or Vista

 Path –> C:\Users\<windows username>\AppData\Local\Microsoft\Windows Live\Contacts\<Live ID>\15.4\DBStore 
WLM_ContactsLiveIDDB_2011

Windows Live Mail 2011 (QFE3 version) – Windows 7 or Vista

Path –> C:\Users\<windows username>\AppData\Local\Microsoft\Windows Live\Contacts\default\15.5\DBStore
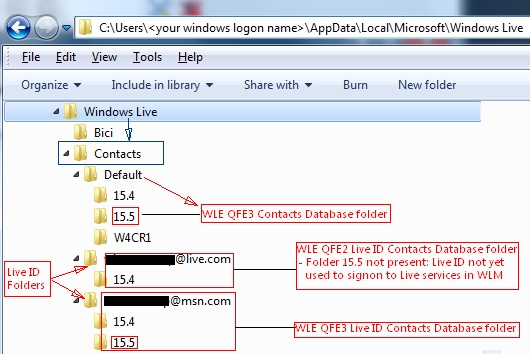
Windows Live Mail QFE3 Contacts '15.5 Database Folders


Windows Live Mail 2009 (see notes below)

       Widows 7 or Vista

Ø C:\Users\<windows username>\AppData\Local\Microsoft\Windows Live Contacts\{85a1e249-964b-475e-82d7-e80ea374a6ad}\DBStore

Windows XP

Ø C:\Documents and Settings\<windows username\Local Settings\Application Data\Microsoft\Windows Live Contacts\{85a1e249-964b-475e-82d7-e80ea374a6ad }\DBStore

Notes: (only applicable to WLM 2009)

ü  WLM 2009 Live ID(Online Mode) like WLM 2009 Default(Offline) mode(as shown above) continues to employ the use of a randomly generated numerical 16-digit hexadecimal number for the Live ID folder name with one additional twist. It creates two(2) numerical folders for each Live ID. One for the primary database and one(shadow) database, the latter for synchronization with the web UI and Windows Live Messenger. 

     The numerical names of these folders will also be different on each pc/operating system.
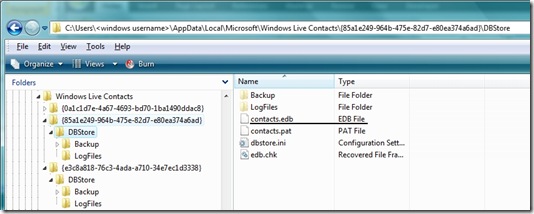
WLM_ContactsLiveIDDB_2009

ü  To determine the exact numerical name assigned to the Live ID(Online) mode contact folder in  WLM 2009 one must reference the following registry key’s ‘Name’ and ‘Data’ fields values.

HKEY_CURRENT_USER\Software\Microsoft\Windows Live Contacts\Database

ü  The Name field in the above registry key will indicate the pathname of ‘both the primary and shadow’ root folder. The pathname shown when viewed in the registry is, once again, a ‘slight misdirection’(but fully understood by the Windows o/s)

-The registry key ‘Name’ values will show:

Windows 7 or Vista:

 C:\Users\<windows username>\Contacts\<Live ID> and

C:\Users\<windows username>\Contacts\<Live ID>\shadow
XP: (pic shown below)

 C:\Documents and Settings\<windows username>\Contacts\<Live ID>

C”\Documents and Settings\<windows username>\Contacts\<Live ID>\shadow
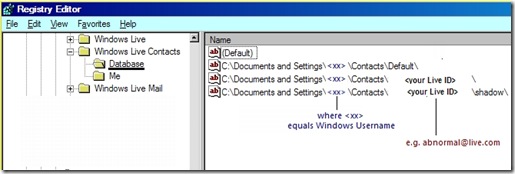
WLM_Contacts_2009_LiveIDRegKey

-Though the Live ID(Online)folder is actually on subfolder below the following:

Windows7 or Vista:

  C:\Users\<windows username>\AppData\Local\Microsoft\Windows Live Contacts

XP:

 C:\Documents and Settings\<windows username\Local Settings\Application Data\Microsoft\Windows Live Contacts

ü  The registry key ‘Data’ value(s) completes the pathname by indicating the assigned hexadecimal number for the primary and shadow subfolders applicable to a respective Live ID(Online) mode DBStore folder and unique contacts.edb file(s)

Comments:

  • Use of the Default(Offline) mode ensures all contacts are only stored locally and not synchronized(or stored) on the web(i.e. on “The Cloud’) at Contacts.live.com
  • Use of the Live ID(Online mode) ensures contacts are stored both locally and on the Live servers(in the ‘Cloud) and always backed up and accessible on any pc by signing on with the respective Live ID at Contacts.live.com
  • If the Live ID is also a Hotmail type account(Live.com, Hotmail.com, Msn.com or other country specific derivatives of the same domain e.g. Live.cn, Hotmail.uk, Live.ne, Msn.ca) then those same Live ID contacts will be accessible for use in the Hotmail email web interface(mail.live.com or hotmail.com)
  • Use of the Live ID(Online) mode in WLM also enables WLM’s ‘Cleanup’ option by linking to the web UI for cleaning up duplicate contacts
  • Use of additional Live ID’s(signing on with a different Live to Windows Live) allows one to have multiple contacts lists for different objectives(friends, family, work, hobbies, etc.)
  • If you read this far(and to appease the parenthetical police and purists) do not confuse working Offline(disconnected from the internet) or Online(connected to the internet) with WLM’s two different Contacts’ modes(Default/Offline[No Live ID sign-in] or Live ID/Online[Live ID sign-in]). If you’re not using a Live ID to sign-in to Windows Live, your contacts are stored and only available Offline (from Windows Live Services)!

Revisions:

Feb 04, 2011: Original Published Date

Feb 05, 2011: Edited for increased clarity and to appease the parenthetical gramma policemen comments Sarcastic smile

April 12, 2011: Updated to reflect Contact folder name (15.5) for Windows Live Mail 2011 QFE3

Windows Live Mail Contacts – Operating Modes


Summary:

  An explanation of the two different types of Contact operating modes in Windows Live Mail
  The two different modes are  Default (Offline)  or Live ID (Online)

Operating Modes:

  • Default (Offline) mode
  1. No Live ID sign on
  2. The Default contact database is locally and solely stored on the user’s machine
  3. Contacts are only accessible in Windows Live Mail (WLM)
  4. No synchronization with web interface
  5. Accessible by configuring WLM to ‘Stop Signing In’

    Version 2011 – WLM Button/Options/Mail/<Connection tab>/<Stop signing in>

Optional Keyboard method – Alt F O M <Connection tab>/Stop signing in>

 – use keystroke Control+Tab to navigate to the Connection tab

    Version 2009 – WLM Menu/Tools/Options/<Connection tab>/<Stop signing in>

  • To ensure operation in the ‘Default/Offline mode’ use the ‘Stop signing in’ option and  thereafter when opening WLM (if prompted to sign on) click ‘Cancel’


  • Live ID (Online) mode
  1. Live ID sign on to Windows Live (is required)
  2. Live ID Contact database is stored locally and also online (Contacts.live.com)
  3. Accessible in WLM and the web interface (Contacts.live.com); IM (Instant Message) contacts are also accessible in Windows Live Messenger (WLMsgr)
  4. Database synchronization occurs between WLM and the web interface
  5. Synchronization is in both directions(changes made in WLM or online impact the other)
  6. Accessible by configuring WLM to ‘Sign in’  to Windows Live

     Version 2011 – WLM Button/Options/Mail/<Connection tab>/<Sign in>
     Version 2009 – WLM Menu/Tools/Options/<Connection tab>/<Sign in>

  • Contacts are unique to a given Live ID used to sign on to Windows Live in WLM
  • Use of a different Live ID to sign on to Windows Live affords the opportunity for a different set of contacts (thus one can switch to a different set of contacts by signing on with a different Live ID)


Comments:

  • Locally stored contact databases and contacts are accessible by WLM but not Windows Explorer
  • ‘Sign on’ is to Windows Live, (i.e. one does not sign on to WLM, it only provides the ability to sign on)
  • ‘Sign on’ is not required to send or receive mail in WLM for email accounts using Pop3, IMAP, or Http protocol
  • ‘Sign on’ is not required to send or receive for Hotmail type accounts (Hotmail.com, Live.com, or Msn.com)
  • ‘Sign on’ does ensure your contacts are always accessible and backed up(online)
  •  Do not confuse working Offline (disconnected from the internet) or Online (connected to the internet) with WLM’s two different Contacts’ modes
    • Default/Offline [No Live ID sign-in]
    • Live ID/Online [Live ID sign-in to Windows Live]
      • If  not using a Live ID to sign-in to Windows Live, your contacts are stored and only available Offline!
      • 

  • For a technical overview of  WLM’s Contacts database see –> Windows Live Mail – Contacts Database

Known Issues:

  • WLM’s ‘Backup’ option is only capable of exporting or importing one email address field per contact of the four available email address data fields (Personal, Other, Work, IM) when exporting to/importing from a CSV (Comma Separated Value) file thus use of the Live ID (Online mode) is recommended  to ensure all email fields’ data is retained (stored on the Live servers)
  • WLM’s ‘Backup’ option does not export or import Categories (formerly called Groups in prior Microsoft email clients). Use of the Live ID (Online mode) is recommended to ensure Category data is retained (stored on the Live servers)
  •  

Revisions:
Dec 27, 2010: Original Draft Date
Jan 30, 2011: Orginal Published Date
Feb 10, 2011: Added link to Windows Live Mail – Contacts Database

Windows Live Mail 2011 – Options Menu

Summary:

  • Snapshots of  Windows Live Mail 2011’s ‘Options’ menu and submenus
  • The ‘Options’ menu on the Windows Live Mail Button contains the following submenus
    • Mail (Configuration settings for the program)
    • @E-mail Accounts (Add, Remove, Properties, Set Default, Import, Export for both Mail and News accounts)
    • Newsgroups (Subscribe, Unsubscribe, Reset newsgroups lists)
    • Feeds (Add, Edit, Delete)
    • Safety Options (Configuration for Junk Filter, Safe/Block Senders, Phishing, Security)
  • The ‘Options’ menu and submenus are accessible by mouse or keystroke commands(below)

Windows Live Mail Button Options Menu:

  • Program configuration and setup
    • Keystroke access –> ALT F  O

  • Mail Submenu:
    • Primary menu for configuration of the program’s functionality
    • Individual tabs are present and contain feature specific settings
    • ‘Advanced’ tab contains ‘Maintenance and Troubleshooting’ tools
    • Keystroke access –> ALT F  O  M

  • @ E-mail Accounts Submenu:
    • Applicable to both Mail and News accounts
    • Location to Add, Remove, Edit account(s) properties; Set Default email and news server accounts; Import and Export email and news accounts(*.iaf filetype)
      • Note: Removal of a Pop3 email account deletes the email account and all messages from Windows Live Mail and the user’s hard drive! (i.e. Back-up/Export/Archive before removal of a Pop3 email account)
    • Keystroke access –> ALT F  O  E

  • Newsgroups Submenu:
    • Subscribe or Unsubscribe to newsgroups on a news server account
    • Reset List of newsgroups on news server account
    • Keystroke access –> ALT F  O  N

  • Feeds Submenu:
    • Manage RSS Feeds
    • Add, Edit,  and Delete RSS Feeds
    • Create new folders for additional feed managment
    • Keystroke Access –> ALT F  O  F

  • Safety Options Submenu:
    • Junk Mail Filter settings
    • Add/Edit/Remove Safe Senders email addresses and domains
    • Add/Edit/Remove Blocked Senders email addresses and domains
    • International – Block Top-Level Domain and Encoding
    • Protect Inbox from potential Phishing links and move phishing email for POP/IMAP accounts to the Junk email folder
    • Security – Select security zone(Internet/Restricted), Block Images in HTML email, and configure Secure Mail(Digital IDs)
    • Trust Center (Microsoft Privacy and Service agreements)
    • Keystroke access –> ALT F  O  S

Revisions:

Sept 27, 2010: Original Publish Date (duplicate post on Windows Live Mail 2011 Ribbon GUI)

Dec 5, 2010: Revised Title to Windows Live Mail 2011 – Options Menu

Dec 6, 2010: Revised Content to show Windows Live Mail 2011 ‘Options’ Menu and Submenus

Jan 6. 2012: Updated tags

May 31, 2012: Revised note on Pop3 account removal for better clarity

Windows Live Mail 2011 – Ribbon GUI

Summary:

  • Snapshots of the Windows Live Mail Wave 4 Ribbon GUI –  WLM Button  and Tabs
  • The Ribbon contains multiple options/tabs – Windows Live Mail Button,  Four(4) Tabs for use in Mail or News mode(Home, Folders, View, and Accounts), a Calendar Tab(Home), and a Contact Tab(Home)
  • A Quick Access Toolbar is available(like Office) that permits the addition of icons for respective features found on each tab.
  • The Ribbon can be minimized (leaving only the WLM Button, Tabs and Quick Access Toolbar)
  • The Quick Access Toolbar can be hidden
  • The ‘About’ item on the Windows Live Mail Button shows the Build and Version number(s)

Windows Live Mail Button:

Note:

  • Click ‘About’ to see your Build and Version number. Optionally the same information can be displayed using a keystroke sequence (ALT F B)

Home Tab:

  •  Mail

  • News

  • Note the Quick Access Toolbar(QAT) on the the bottom of the Ribbon.
    • Items on WLM’s Menu(ALT F) or items on the Ribbon tabs can be added to the QAT by right clicking an item to obtain the context menu’s ‘Add to Quick Access Toolbar’ option. Each item added will appear as an icon on the QAT.
    • Items on the QAT cannot be rearranged thus plan ahead(the item’s position/order from left to right) for ease of use to avoid having relatively common items in different locations(on the QAT).

Folders Tab:

  • Mail

  • News

View Tab:

Accounts Tab:

Calendar Home Tab:

Contacts Home Tab:

 Feeds Tab(s):

  • The Feeds Home Tab is shown.  Three other tabs are available (Folders, View, and Accounts) and contain similar options as those on the Folders, View and Accounts tabs shown above.  Items not applicable to ‘Feeds’ management will not be present or available.

Revisions:

June 4, 2010: Original Publish Date
Sept 11, 2010: Updated to differentiate Mail and News tabs; Added Calendar and Contacts Home tabs
Feb 13, 2011:  Added Feeds Home Tab and note on other tabs present in the Feeds module

Jan 6, 2012: Updated pictures for better resolution

Jun 26, 2012: Updated tags.


Viewing A Windows Live Mail Message Subject Field in Vista and Windows 7 using Windows Explorer

Summary:

  • Windows Live Mail stores Email and News messages on a pc in a viewable text file format.
  • Email messages use the file type extension ‘eml’; News messages use ‘nws’
  • Both Email and News messages use a hyphenated numerical/hexadecimal format as the filename
    • Two examples for Mail are 00294823-00000147.eml and 26A6701F-00000002.eml
    • Two examples for News are 0FDD08FE-0003DBFF.nws or 63F86350-0003DB89.nws
  • Neither of the above filenames by default show the message’s ‘Subject’ or ‘Title’ field when viewed in Windows Explorer

Recommendation:

  • If using Windows Vista or Windows 7, the ‘Subject’ field can be enabled in Windows Explorer

Instructions:

  1. To add the ‘Subject’ (or ‘Title’ field via the Windows Explorer menu)
  2. Open Windows Explorer
  3. Navigate to the Windows Live Mail folder containing the respective account’s message(s)
  4. The default location for your mail and news folders in Windows Live Mail is:
    • C:\Users\<your Windows logon id>\AppData\Local\Microsoft\Windows Live Mail\<your email or newsgroup account name>
  5. Click on ‘View’ on the Explorer menu or press Alt V
  6. Scroll and select ‘Choose Details’
  7. Scroll and select ‘Subject’ and/or ‘Title’ (see Note below for additional available fields)
  8. Click ‘Ok’

Note:

  • Applicable to all released versions of Windows Live Mail (2011, 2009, 2008)
  • Other fields in addition to ‘Subject’ are available (e.g. To Address, From Address etc) when configuring the ‘Choose Details’ option in Vista’s Windows Explorer
  • This procedure is also applicable to Vista’s Windows Mail for mail and news messages
    • Vista’s Windows Mail default location for your ‘mail’ folders is:
    •  —>  C:\Users\<your Windows logon id>\AppData\Local\Microsoft\Windows Mail\Local Folders
    • Vista’s Windows Mail default location for your ‘news’ folders is:
    • —>   C:\Users\<your Windows logon id>\AppData\Local\Microsoft\Windows Mail\<newsgroup name>

Revisions:

Sept 15, 2008: Original Published Date

Oct 26, 2008: Added ‘Note:’ section on other available fields and applicability to Vista’s Windows Mail messages

Feb 16, 2010: Republished as new entry to reflect applicability to Windows 7

Mar 11, 2010: Corrected spelling

Oct 27, 2010:  Upload new pic to WordPress, original pic had invalid Live SkyDrive location

Clubhouse Tags: Clubhouse, How-To, Windows Live, Mail, News, customization, Vista, Windows 7

Font Color – Gray Text of Read Messages in Windows Live Mail 2009

Summary:

  • Windows Live Mail 2009 by design changes the color of mail and news message(s) text from Black to Light gray once a message(s) is read.
  • The color of the text is controlled by the Windows’ Appearance properties ‘Disabled Item’
  • Multiple options are available depending upon the operating system(XP, Vista, or Windows 7)
  • Gray Text of read messages also applies to Sent messages

How To Change/Override:

1. Rules (XP, Vista, or Windows 7)

For all messages
Highlight it with Black
and Stop processing more rules

or optionally

For all messages
Highlight it with Default
and Stop processing more rules

Notes:

– A rule is applicable to received messages for Pop3 Email accounts and NNTP Newsgroup messages.

– A separate rule must be created for each(Mail and/or News).

– A rule can be applied manually to items in the Sent Items and/or Storage Folders

2. Modify Display Properties (Disabled Item)

XP: Changing the color of ‘3D Objects’ in Windows ‘Advanced Appearance’ options which will automatically modify the color of the ‘Disabled Item’ as well as other 3D Objects. Thus if not acceptable for your viewing then use one of the above ‘Rules’ instead

  • Control Panel\Display\Appearance\Advanced\<Scroll and select the ‘3D Objects’>

– Change the option labeled  ‘Color 1’

Vista and Windows 7: Changing the color of the Disabled Item font will only modify the ‘Disabled Item’

(Note: in each method below, the Control Panel was ‘configured to be shown on’ and ‘accessed from’ the Start Menu[Orb]

  • Vista:

Control Panel\Personalization\Windows Color and Appearance\Classic Appearance Properties\

– Click Advanced, click the Down Arrow in the ‘Item’ field, then scroll and select ‘Disabled Item’

-> Change the option labeled ‘Color’ (e.g. to Black)

  • Windows 7:

Control Panel\Personalization\Window Color\Advanced appearance settings

– Click the Down Arrow in the ‘Item’ field, then scroll and ‘Disabled Item’

-> Change the option labeled ‘Color’  (e.g. to Black)

Revisions:

Sept 04, 2009: Draft Creation date

Sept 08, 2009: Original Publish date

Dec 31, 2009: Updated to add Option 2(Disabled Item)

Jan 14, 2009:  Edited for readability

Send and Receive in Windows Live Mail 2009

Summary:

  • Windows Live Mail(WLM) version 2009 uses a feature called ‘Sync’ to send and receive messages for email and newsgroups and also for updating RSS Feeds
  • The Sync feature in WLM is the **replacement** for the traditional Send and/or Receive option found in prior/other email clients (e.g. Outlook 2003/2007, Windows Mail[Vista], and Outlook Express[XP])
  • A Sync can be performed via the WLM Menu, the WLM Toolbar, or using the optional keyboard function keys
  • WLM has a common Outbox for all outgoing mail and news messages
  • A Sync performs both Send and Receive(unlike prior clients that permitted a Send without a Receive)

Performing A Sync in WLM:

  Mail Mode

  • Menu(click on Tools) or the Toolbar(Sync button/icon)
    1. If the menu is not present, press Alt M
    2. If  the Sync button is not present, right click on the Toolbar/Customize to add the Sync button

Three options are available:

      • Sync (Choose an email account) – sends/receives all message for the selected email account
      • Sync All Mail Accounts(Keyboard key F5 performs the same function) – sends/receives all messages for all mail accounts and sends the contents of the Outbox
      • Sync Everything (Keyboard keys Control F5 performs the same function) –sends/receives messages for all mail, configured news accounts, and also sends the contents of the Outbox

News Mode

  • Menu(click on Tools) or the Toolbar(Sync button/icon)
    1. If the menu is not present, press Alt M
    2. If  the Sync button is not present, right click on the Toolbar/Customize to add the Sync button

Three options are available:

      • Sync Newsgroup(choose a newsgroup)
      • Sync All Newsgroups(optionally F5) – sends and receives all configured newsgroup messages
      • Sync Everything(optionally Control F5) – sends and receives all newsgroup messages, sends emails present in the Outbox,

Feeds Mode

  • Menu(click on Tools) or the Toolbar(Sync button/icon)
    1. If the menu is not present, press Alt M
    2. If  the Sync button is not present, right click on the Toolbar/Customize to add the Sync button

Two options are available:

      • Sync All Feeds(optionally F5)
      • Sync Everything(optionally Control F5) – syncs all feeds, then syncs all mail and news, and finally sends messages in the Outbox

Revisions:

April 15, 2009: Draft Version and Original Published Date

May 29, 2009: Revised to include Feeds Sync

July 17, 2009: Corrected Typos and Punctuation

Jan 29, 2012: Removed defunct tag links and update with new tags

Viewing A Windows Live Mail Message Subject Field in Vista’s Windows Explorer

Note:  This article has been superseded by a later article dated February 16, 2010 for applicability to Windows Live Mail on both Vista and Windows 7.

Viewing A Windows Live Mail Message Subject Field in Vista and Windows 7 using Windows Explorer

https://liveunplugged.wordpress.com/2010/02/16/viewing-a-windows-live-mail-message-subject-field-in-vista-and-windows-7-using-windows-explorer/

Summary:

  • Windows Live Mail stores Email and News messages on a pc in a viewable text file format.
  • Email messages use the file type extension ‘eml’; News messages use ‘nws’
  • Both Email and News messages use a hyphenated numerical/hexadecimal format as the filename
    • Two examples for Mail are 00294823-00000147.eml and 26A6701F-00000002.eml
    • Two examples for News are 0FDD08FE-0003DBFF.nws or 63F86350-0003DB89.nws
  • Neither of the above filenames by default show the message’s ‘Subject’ field when viewed in Windows Explorer

Recommendation:

  • If using Windows Vista, the ‘Subject’ field can be enabled in Windows Explorer

Instructions:

  1. To add the ‘Subject’ field via the Windows Explorer menu
  2. Open Windows Explorer
  3. Navigate to the Windows Live Mail folder containing the respective account’s message(s)
  4. The default location for your mail and news folders in Windows Live Mail is:
    • C:\Users\<your Windows logon id>\AppData\Local\Microsoft\Windows Live Mail\<your email or newsgroup account name>
  5. Click on ‘View’ on the Explorer menu or press Alt V
  6. Scroll and select ‘Choose Details’
  7. Scroll and select ‘Subject’ (see Note below for additional available fields)
  8. Click ‘Ok’

Note:

  • Applicable to all released versions of Windows Live Mail (2011, 2009, 2008)
  • Other fields in addition to ‘Subject’ are available (e.g. To Address, From Address etc) when configuring the ‘Choose Details’ option in Vista’s Windows Explorer
  • This procedure is also applicable to Vista’s Windows Mail for mail and news messages
      • Vista’s Windows Mail default location for your ‘mail’ folders is:
        C:\Users\<your Windows logon id>\AppData\Local\Microsoft\Windows Mail\Local Folders
      • Vista’s Windows Mail default location for your ‘news’ folders is:

    C:\Users\<your Windows logon id>\AppData\Local\Microsoft\Windows Mail\<newsgroup name>

Revisions:

Sept 15, 2008: Original Published Date
Oct 26, 2008: Added ‘Note:’ section on other available fields and applicability to Vista’s Windows Mail messages
Oct 27, 2010:  Uploaded new pic to WordPress, original pic had invalid Live SkyDrive location, note about article supersedence
Jan 30, 2012: Removed tags redirecting to a defunct location, updated with new tags

Windows Live Mail Fails to Shutdown Properly

Summary:

Windows Live Mail(WLM) may fail to shutdown properly due to its program file(wlmail.exe) remaining resident after closing/exiting thus requiring user termination by use of the Windows Task Manager End Process option.

More Information:

A failed shutdown may be noticeable by an inability to re-open WLM for subsequent use

Comments:

1. Ensure ‘Upload Larger Images to the Web When Sending a Photo E-mail’ is checked in WLM’s configuration setting:

  • Tools/Options/Send

– This option is only available when signed into WLM with a Windows Live ID

Notes:

This type of failed shutdown may reappear if a new compose window or a draft message has been opened, even when closed without further editing, saving or sending.  If so, then disable the ‘Upload Larger Image’ option(Uncheck/Click Apply) then re-enable(Check/Click Apply)

Revisions:

July 31, 2008: Original Published Date

The ‘Complete’ Uninstall/Reinstall Method For Windows Live Mail

Summary:

  • An uninstall/reinstall procedure for Windows Live Mail(WLM) that supplements the normal removal method using Add-Remove Programs(XP) or Programs and Features(Vista)
  • This method is extensive in removing the program but also deletes select registry settings, the WLM Message Store folder and the WLM default installation program folder
  • Review the method , the *asterisk* items(additional comments), the impact and understand the consequences prior to use


Reference:

Quote

1.    After backing up your messages & accounts through the export options, uninstall WLM through Control Panel.

2.   Use Regedit (or your favorite registry editor) to delete the registry Keys (if they exist)*

  •  
    •  
      • HKEY_CURRENT_USER\Software\Microsoft\Windows Live Mail
      • HKEY_LOCAL_MACHINE\Software\Microsoft\Windows Live Mail
      • HKEY_CURRENT_USER\\Software\Microsoft\Windows Live Mail desktop
      • HKEY_LOCAL_MACHINE\Software\Microsoft\Windows Live Mail desktop

3.    Now navigate to your WLM Message Store folder** and rename it

  •  
    •  
      • So you can keep it as a backup – messages can be dragged from the message store to your WLM interface as a method of importing them, or you can import messages directly by Browsing to your old(renamed) Message Store with File->Import->Messages->Windows Live Mail->Next->Browse…
      • Also, if any extra spellchecking languages have been installed, or you want to re-use your custom dictionary, then the contents of the “Proof” folder (within the default location Storage Folder) should be backed up so you can restore it after the reinstall. Furthermore, after the reinstall, if inclined, you could try putting your old Message Store back in place by renaming it again).

4.    Go to the ‘Windows Live Mail’ ‘Program Files’ folder (C:\Program Files\Windows Live\Mail) and delete it.

5.    Run Windows Live Beta Remover*** if necessary.

6.    Reboot your computer.

7.    Now install WLM and import your accounts and messages.  It may be best to disable any AntiVirus program you are running while installing WLM and running it for the first time.

Asterisk Items:
*Note that because the registry keys are deleted, messages, accounts, and message rules will be imported again from Outlook Express/Windows Mail, so if you do not want this to happen, first delete them from those redundant mail clients.

**To find the location of your message store, go:  Tools->Options…->Advanced [tab]->Maintenance->Store Folder  (the default location is a hidden folder). If you have moved your Storage Folder from its default location, you should also rename the old Storage Folder which remains in the default location.

The default location of Windows Live Mail’s Message Store is:

Vista:  %localappdata%\Microsoft\Windows Live Mail

  • (C:\Users\<Windows user account>\AppData\Local\Microsoft\Windows Live Mail)

XP:   %userprofile%\Local Settings\Application Data\Microsoft\Windows Live Mail

  • (C:\Documents and Settings\<windows user account>\Local Settings\Application Data\Microsoft\Windows Live Mail)

***The  Windows Live Beta Remover may be helpful if you have installed Windows Live beta programs previously, as it removes all the old beta installers

  \End Quote


Revision:

May 22, 2008:  Original Published Date (bullets, hyperlinks, formatting added to original quote)

May 23,2008:  Revised Title(from ‘Compleat’ to ‘Complete’) after lexical and stipulative input from Messrs. Peter and Noel Webster 😉

May 24, 2008:  Windows Live Tags added

Windows Live Tags: Mail, How-To, accounts, clubhouse

Adding English(UK) as an additional Spell Checker in Windows Live Mail Version 2008

Summary:

  • Windows Live Mail’s Version 2008 release does not include an option to choose an alternate UK English SpellCheck
  • The method below provides the ability to add the option for the UK English SpellCheck and also retain the US English SpellCheck
  • This method is ***not necessary or applicable*** for Windows Live Mail 2009


Reference:

How to create English (UK) as an additional spellchecker in WLM

  • Compliments of Bob Lucas – posted in the Microsoft public newsgroup Windows.Live.Mail.Desktop

Quote

After a lot of trial and error, I have discovered a way of including the English (United Kingdom) spellchecker as an ADDITIONAL language option, without losing the default English (United States) spellchecker.

1. The Language ID for English (US) is 1033 (or 0409 in hexadecimal).

2. The language ID for English (UK) is 2057 (or 0809 in hexadecimal).

3. With Windows XP and later, set the folder options to “Show hidden files and folders”.

4. All additional spellcheckers are installed in a folder called “Proof” in “%userprofile%\Local Settings\Application Data\Microsoft\Windows Live Mail”, which includes a separate folder for each language.

  • The name of each different language folder is “prf00xx” or prf0xxx, where “xx” or “xxx” is the hexadecimal code for each language.

5. In “%userprofile%\Local Settings\Application Data\Microsoft\Windows Live Mail”, create a new folder named “prf0809” (hexadecimal for English (United Kingdom)) – and create a further sub-folder named “1”.

6. Then, open the folder “%programfiles%\Windows Live\ Mail\Proof\prf009\2”.

  • This folder contains the basic spellchecker files for various versions of the English language.
  • Copy the three files, mssp3en.lex; MSSpell3.DLL and spell.ini from “%programfiles%\Windows Live\ Mail\Proof\prf009\2” to “%userprofile%\Local Settings\Application Data\Microsoft\Windows Live Mail\prf0809\1” (i.e. one of the folders you created previously).

7. Then, right click on “spell,ini” (in “prf0809/1”) and change Lang=1033 to Lang=2057. Save “spell.ini”.

8.  Finally, open Windows Live Mail and click on Tools / Options / Spelling.

  • The updated list of installed spell checkers should include English (United Kingdom), in addition to English (United States). Set whichever version you prefer as the default spellchecker.

/ End Quote


Revisions:

May 10, 2008: Original Published Date (bullets added to original quote for clarity)

May 24, 2008: Corrected typographical errors(mine); Windows Live Tags added

July 20, 2009: Updated Title and Summary to clarify applicability to **only** Windows Live Mail 2008

Windows Live Tags: Mail, How-To, customization, clubhouse

Migrating Messages in Accounts from Outlook Express to Windows Live Mail

Summary:

How to resolve an unsuccessful migration of messages from Outlook Express(OE) by utilizing Windows Live Mail’s(WLM) Import function.

More Information:

Reference: Windows Live Email Support Blog, May-2-2008

Comments:

  • The method in the provided article imports folders and messages from an existing account(s) in OE
  • It does not import or create the source(OE) email account in the destination WLM client(see Note)
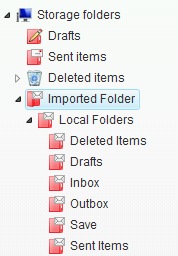
  • Folders are imported to sub-folders in WLM’s Storage Folders\Imported Folders\Local Folders

  • Messages present in OE’s default folders(Inbox, Drafts, Deleted Items, Outbox, Sent Items) will be present, if successful, in each respectively named folder
  • User created folders in OE can also be successfully migrated(e.g. ‘Save’ folder in above picture)
  • Note: Since the import does not import\create the email account in WLM, the user must manually create the email account(if not already present, and also any user created folders) or optionally import the email account using a previously created/saved OE *.iaf file as source.
  • Once OE’s messages are imported they can remain in that location, or moved to a user created folder within an email account(WLM by design creates a folder structure for each unique email account), or moved to user created folder within the Storage folders.

Moving Messages from the Imported Storage Folder(s) Location to an Email Account:

    1. Drag the message from an imported folder to a sub-folder in an existing/created email account , or
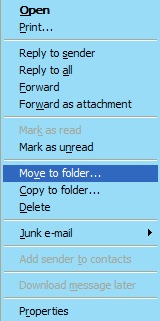
    2. Select a message(or group of messages) in an imported folder, then right click to make the context menu’s options available(e.g. Move to folder or Copy to folder), then choose the option of your choice to move or copy the message to the desired location(i.e. a user created folder in the email account)

Note: The above methods for managing/archiving messages within an email account’s sub-folders in WLM might be perceived as consistent with archiving messages in in OE’s Local Folders, though this approach may not be the most secure place:

  • Removing(deleting) an email account in WLM also removes/deletes all folders and messages from WLM’s message store on the hard drive, thus the following optional method(see below) is highly suggested.

Moving Messages from the Imported Storage Folder(s) Location to another user created Storage Folder:

    1. Drag the message from an imported folder to a folder/sub-folder in the Storage folder, or
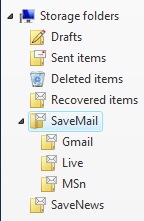
    2. Select a message(or group of messages) in an imported folder, then right click to make the context menu’s options available(e.g. Move to folder or Copy to folder), then choose the option of your choice to move or copy the message to the desired location(i.e. a user created folder, e.g. SaveMail, in the Storage folders)

Note: Utilizing the Storage folder has the following benefits.

  • The Storage Folders(and sub-folders) are not removed/deleted from WLM message store when an email account is deleted, thus inherently more secure
  • A common location for archiving important messages external to an email account’s default folders(i.e. Inbox, Drafts, Sent, etc)
  • Message rules for Pop3 email accounts can also move messages to this location
  • Easier to backup important archived messages instead of individual email accounts(e.g. The SaveMail folder and its’ three sub-folders)

Revisions:

May 3, 2008: Original Published Date

May 24, 2008: Windows Live Tags added

Moving Messages from Windows Live Mail to Vista’s Windows Mail

 Summary:

  • Windows Live Mail does not include a File Export option to move messages to Vista’s Windows Mail email client
  • The traditional ‘Drag and Drop’ method is one work-around capable of achieving that task

 Step 1:  Drag Messages from Windows Live Mail to an Explorer FolderCreate a new folder using Windows Explorer on the desktop(e.g. WLMDragEmail)
Create sub-folders in the new folder with identical names as the folders in your Windows Live Mail email account
– Inbox, Outbox, Sent, etc (including any user created folders)
Open Windows Live Mail
Resize each window to fit on the desktop(one for the new folder and one for Windows Live Mail)
Switch to Windows Live Mail and select messages from a Windows Live Mail folder e.g Inbox
– Control A can be used to Select All
Drag those messages to the identical named sub-folder in the earlier created Windows Explorer folder.
Repeat for each Windows Mail folder(Outbox, Sent, etc including any user created folders)
Close Windows Live MailStep 2:  Drag Messages from an Explorer Folder to Vista’s Windows MailOpen Vista’s Windows Mail
Resize again to show two windows–the Explorer folder and Windows Mail
Ensure an email account is created (including any user created folders)
Drag the messages from the Windows Explorer folder(s) to the like named folder(s) in Windows Mail

Revisions:

May 3, 2008: Original Published Date

May 24, 2008: Summary Content Updated; Windows Live Tags added

Windows Live Tags: Mail, Vista, How-To, drag and drop, clubhouse

Repairing Windows Live Mail 2008 Quick Views Counter

 Summary:

  • Window’s Live Mail(WLM) ‘Quick views’ can ‘break’ when a folder is deleted in WLM(within an Account or under the Storage Folders), un-subscribing to a newsgroup, or by deletion of an RSS Feed.
  • Common symptoms of a broken/corrupted ‘Quick views’  are an inaccurate message counter; a failure to display current messages; or a failure to display messages received, copied, or moved since the corruption.
  • To repair the Quick Views counter’s functionality a registry edit is necessary(see Note of Caution below)

 Repair Method:

1.  Close WLM
2.  Open Regedit
3.  Start/Run/Regedit
4.  Navigate(in the left hand pane) to the following location:
     HKEY_CURRENT_USER\Software\Microsoft\Windows Live Mail\
5.  Click on Windows Live Mail(left hand pane) to reveal the key’s content
6.  Using the cursor/scroll bar(right hand pane) find the entry ‘SearchFolderVersion’
    – This entry is in the field/column with a header titled ‘Name’
7.  Click on ‘SearchFolderVersion’ to highlight that single key
8.  Delete the entry  ‘SearchFolderVersion’
9.  Close Regedit
10. Open WLM
    – the registry key will be recreated and WLM will poll for unread messages

 Note of Caution: 

– Registry editing can create serious problems if used incorrectly. Proceed with the above at your own risk.- For additional information about the using the Windows Registry Editor 


Revisions:

April 15, 2008: Original Published Date

May 12, 2008:  Additional reasons for ‘Quick view’ corruption added(thanks Ildhund)

May 24, 2008:  Windows Live Tags added

Windows Live Tags: Mail, How-To, RSS feed, accounts, clubhouse

How to Backup Windows Live Mail Accounts, Contacts and Messages

Summary:

  • Windows Live Mail includes options to backup Accounts(Mail, Newsgroup), Contacts, and Messages(Mail and Newsgroups)


Recommendation: (Prior to Backing Up)

  • Create Four(4) new folders using Windows Explorer in the location of your choice(e.g. folder on the hard drive, external drive, or jump drive)
  • Folder names can be full or abbreviations — Mail, News, Contacts, Msgs (highly suggested to aid organization)
  • Note: Consider appending a date suffix to the Messages folder name (e.g. Msgs_080315) 


Email and News Accounts:

Tools/Accounts/<select and account>/Export

Use the Browse or Browse folders option to navigate to the Mail folder(created above)

– Export each email account account to the Mail folder, repeating the process for each email account

–  Export each newsgroup account to the News folder, repeating the process for each newsgroup account

– Each account exported will be saved using the Email or News account name with a filename extension of *.iaf

Contacts:

Tools/Contacts/File/Export/Comma Separate Values

Enter a filename e.g. Cont_080315.csv, then click Browse to navigate to the Contacts folder(created above)

–  Modify the filename if more than one Live ID is in use

– – If multiple Live ID’s are in use, it is necessary to sign-on with each Live ID  in Windows Live Mail to have access to and export that accounts contact.  If Live ID’s are not in use, all pop3 accounts use the default and common Contact list.

– Contacts will be saved as a *.csv file

Messages:

Important – a blank folder is required(created as suggested above); 

File/Export/Messages/Windows Live Mail/

Click Browse to navigate to Msgs folder, click OK, click Next

Choose one of two options(All Folders or Selected folder) – if ‘Selected’ use the Control key for multiple selections, then click next to start the Export. Do not interrupt the export process. Once through Click Finish.

– The resultant export will include all folders, subfolders and messages(news and mail)

– Do not use this folder for any other storage.

–  If the process is repeated later, the blank folder is still required

Revisions:

March 15, 2008:  Original Published Date

April 1, 2008:  Recommendation section added

May 23, 2008: Windows Live Tags added

Moving Messages from Vista’s Windows Mail to Windows Live Mail


Summary:

  • Windows Live Mail includes an ‘Import’ option to import messages from Vista’s Windows Mail email client(Method 1)
  • Alternatively, Vista’s Windows Mail messages can also be dragged to a Windows Explorer folder, then dragged to a folder(s) in Windows Live Mail(Method 2)


Method 1:

Export Messages from Windows Mail

Create a Blank Folder on your desktop(e.g. WMExport)
Open Windows Mail
File/Export/Messages
Select Windows Mail
Click Next
Click Browse and navigate to the blank folder on the Desktop(choose the folder, do not open the folder)
Click Select Folder
Click Next(if the folder is not empty go back to the beginning)
Select All Folders or Selected Folders
Click Next
Wait for the Export to finish and the prompt ‘Your messages were exported in Windows Mail format’
Click Finish

Import Messages into Windows Live Mail

Open Windows Live Mail
Ensure you have setup all email accounts
Click File\Import\Messages\
Select Windows Mail
Click Next
Click Browse and navigate to the folder created earlier for exporting the messages
Click OK(the Location of Message dialog box will now contain the correct path and folder)
Click Next
Click All or Selected Folders
Click Next
Wait for import process to finish
The Windows Live Mail Import Dialog box will prompt ‘ Your Messages were imported in Windows Mail Format’
Click Finish

Move Messages from Windows Live Mail Storage Folders to the an Email Account’s Folders

Scroll to the Windows Live Mail Storage folders\Imported Folder
Click to expand
Drag the messages in each sub-folder to the appropriate account

Method 2:

Note: This method uses the traditional ‘Drag and Drop’ approach. Some may find this approach more familiar or easier.

Drag Messages from Windows Mail to an Explorer FolderCreate a new folder using Windows Explorer on the desktop(e.g. WMDragEmail)
Create sub-folders in the new folder with identical names as the folders in your Windows Mail mail account
– Inbox, Outbox, Sent, etc
Open Windows Mail
Resize each window to fit on the desktop(one for the new folder and one for Windows Mail)
Switch to Windows Mail and select messages from a Windows Mail folder e.g Inbox
– Control A can be used to Select All
Drag those messages to the identical named sub-folder in the earlier created Windows Explorer folder.
Repeat for each Windows Mail folder(Outbox, Sent,etc)
Close Windows MailDrag Messages from an Explorer Folder to Windows Live MailOpen Windows Live Mail
Resize again to show two windows–the Explorer folder and Windows Live Mail
Ensure an email account is created
Drag the messages from the Windows Explorer folder to the like named folder in Windows Live Mail 

Revisions:

Feb 14, 2008: Original Published Date

May 23, 2008. Windows Live Tags added

Windows Live Tags: Mail, Windows Vista, How-To, clubhouse